RCR #010 Build Progress

Peter Delaney

GT40s Supporter
Doug, I just welded a 5/8" spigot, angled forward at 45deg, to each of the main cooling system pipes - just in front of the front bulkhead.

That way, you get "suck & blow" as the main stream passes these spigots. The spigots are plumbed back thru the front bulkhead & into the heater core in the evap/fan unit under the dash (with a basic cable-controlled heater water valve in one leg).

It seems to work very well - plenty of heat in winter & no noticeable effect on engine cooling in winter or summer. It also conforms to my principle of keeping everything as simple as possible.

Kind Regards,

Peter D.
 
My son and I tried to install the dash, but we have a few interference spots with the chassis. The vents, ignition switch and the dash harness hit the chassis. I'll have to do a little "notching" to get it to fit. But I thought I would post some pictures to give everyone an idea of what it will look like.

misc%20fun%20002.jpg


misc%20fun%20005.jpg
 
Looking good Bill. are you going to get a similar label plate made up for the left hand side of the steering wheel switches too?

Regards

Jack
 
Yes I am. I ordered it today and another one to replace the one on the right. The current one is .020 thick and I am having him make the replacement and the one on the left .062 thick. I should have them in about 3 weeks. Gives me time to "notch" the chassis and install the AC unit
 

Pete K.

GT40s Supporter
Looks great - and there looks to be more room in there than I thought there would be. Almost "roomy."

What are you doing to fill the 1" gap between the top of the dash and bottom of the windshield opening?
 
Once I notch the chassis, the dash should slide right in. The dash vents and the back of the ignition switch hit the chassis.
 
Well, I fitted (or tried) the AC system tonight. It looks like it's going to be tight and hang down a bit. I'm using a Vintage Air Mini Gen II with electric servos. It's a very nice system, and I hope to make it work. I think I can raise it another inch.

AC%20008.jpg


AC%20009.jpg


Bill D
 

Alex Hirsbrunner

Lifetime Supporter
Hi Bill,

Thanks for posting the A/C pics, you have the unit fitting a bit higher than I was able to get the mock up box to fit - thats what I was hoping to see!

Best Regards,

Al
 

Alex Hirsbrunner

Lifetime Supporter
Hi Bill,

I noticed that there is a square tube (see below) welded to your chassis that is not on my RCR - can you tell me what it is for (it is just to hold up the A/C unit)?

Thanks,

Al
 

Attachments

  • Picture 2.jpg
    Picture 2.jpg
    67.2 KB · Views: 1,381
Al,
It was in the first few chassis before we lengthened the under dash panel and integrated the brace into a single panel....Bills was the last of this design...we just simplified the process...
 
Progress Report...
Over the last month, I've been busy on the car. I fabricated a tunnel similar to some originals I've seen. The switch console houses a master cutoff switch, the SPA fire suppression system activation, and a line lock switch for the rear wheels since I don't have an emergency brake.

console%20004.jpg


I decided to make the cover plate two pieces. The front piece houses the switches and will be covered with an engraved panel like the ones on the dash. The rear section will be padded with leather to provide a sort of arm rest.

I then fabricated a rounded tunnel cover that fits between the front of the switch console and teh front bulkhead. The rounded tunnel is more like the originals. It's made from .040 5052 aluminum and will be rivited in place. It will be covered with carpet.

tunnel%20cover%20002.jpg


tunnel%20cover%20001.jpg


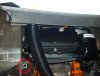
bought a Vintage Air air conditioning system (Mini Gen II, P/N 66005-VUZ-A) with AC, heat and defrost. Many of the GT40 owners I spoke with said the heat portion isn't really needed unless you live in the north east. So, my plan is to use just the AC and the defrost.

Here is the AC mocked up with jack stands.

AC%20008.jpg


I followed the instructions by installing the ducts to the unit, then placing the unit on a floor jack inside the car. I then raised the unit as high as it would go, marked the hole locations, removed the unit, drilled the holes, then installed the unit with the included hardware. WHEW!! All this took the better part of one day doing the work alone. It would be far easier if I had one or two friends helping.

evaporator%20001.jpg


Two types of vents come with the kit - eyeball style similar to the type on original GT40s and various louver styles found in most modern production cars. I installed the eyeball style in my dash and feel it looks pretty damn good.

dash%20vents%20002.jpg


The drier I selected is the chrome unit with a trinary safety switch built in (P/N 07309-VUQ). The trinary safety switch encompasses low pressure and high pressure compressor clutch cutoff functions and electric fan engagement signal at 220 psi.

harness%20flange%20003.jpg


I got my Weber 48 IDA setup on Monday, 6 November '06!! I bought them through Very Cool Parts (verycoolparts.com) in Enterprise, AL. They are sweet looking. I had Red Line Weber set them up to match my engine's spec. This gives me a base line from which a little fine tunning will be all that is needed.

webers%20001.jpg


Temporarily placed on the engine until my inlet manifold gaskets get here.
webers%20009.jpg


webers%20012.jpg


webers%20014.jpg


Bill D
 
nice job Bill. Do you think Wayne could set me up with a throttle linkage like that for my webers? I would like to get them on this winter. thanks, chuck
 

Doug S.

The protoplasm may be 72, but the spirit is 32!
Lifetime Supporter
As usual, Bill, top notch work. The engine is looking great, BTW. I like those valve covers & hope to achieve a similar look for my engine build. Of course, nothing beats the look of those webers!!!!

Thanks!!

Doug
 
Fabricated two dash panels from .060 5052 aluminum to house my dash switches in.

switch_panel%20002.jpg


I found a company called Aircraft Engravers in CT that makes cockpit panels for aircraft. I asked them if they could make some panels for my car and they said they could. I sent them dimensional drawings and they made two panels (one large and one smal). Here is the first one made for the small switch plate that mounts to the right side of the dash...

switch%20panel.jpg
[/img]

And here is the final version installed to the plate and mounted in the dash...

switch_panel%20009.jpg


switch_panel%20009a.jpg


Tomorrow I'll finish the other switch plate.

Cheers
Bill D
 
Back
Top