
You are using an out of date browser. It may not display this or other websites correctly.
You should upgrade or use an alternative browser.
You should upgrade or use an alternative browser.
RCR #010 Build Progress
- Thread starter Bill D
- Start date


Alex Hirsbrunner
Lifetime Supporter
Hi Bill,
The wiring looks very pro. Since I see what looks like an AC receiver/dryer, I was wondering if you are using the vintage air setup that comes with the deluxe plus kit from Fran. I have not recieved mine yet and was wondering if you could post a pic of how you mounted the under dash unit as I only have a cardboard mockup to play with.
Thanks,
Al (RCR #24)
Hi Al
Congrats on purchasing your RCR GT40!!
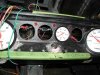
Yes, that's a Vintage Air chrome dryer with the integral trinary switch. Fran did not have the AC system when I bought my car. I worked with a local Vintage Air distributor to determine my requirements.
I bought a Mini Gen II AC system (66005-VUZ-A) with AC/heat/defrost. I haven't mounted the evaporator yet. It uses electrical servos and not engine vacuum to operate the flaps. I also bought the 4-knob rotary control panel (49200-RHA). I only used the AC temp switch from the pod. In place of the off/fan speed switch, I used a SPST on-off toggle switch for AC power, and a SP3T on-on-on toggle switch for fan speed. In place of the vent mode switch, I'm using a SPDT on-on toggle switch for bi-level and defrost. This gives the dash a more original appearance.
I'm not planning on using the heater function. And I hope to install the evaporator this weekend. I can post pics if you like.
Cheers
Bill D
knobHopefully this weekend. I can take pics and post them.
Congrats on purchasing your RCR GT40!!
Yes, that's a Vintage Air chrome dryer with the integral trinary switch. Fran did not have the AC system when I bought my car. I worked with a local Vintage Air distributor to determine my requirements.
I bought a Mini Gen II AC system (66005-VUZ-A) with AC/heat/defrost. I haven't mounted the evaporator yet. It uses electrical servos and not engine vacuum to operate the flaps. I also bought the 4-knob rotary control panel (49200-RHA). I only used the AC temp switch from the pod. In place of the off/fan speed switch, I used a SPST on-off toggle switch for AC power, and a SP3T on-on-on toggle switch for fan speed. In place of the vent mode switch, I'm using a SPDT on-on toggle switch for bi-level and defrost. This gives the dash a more original appearance.
I'm not planning on using the heater function. And I hope to install the evaporator this weekend. I can post pics if you like.
Cheers
Bill D
knobHopefully this weekend. I can take pics and post them.
Bill I think you are doing a fantastic job on your build, and I continually use your pics as guides for some of my ideas. I still have a problem with the demo labels. I think the right side of your dash shold be continued on to the left side. I know it 's not period correct, but then neither is the right side either.
I am not knocking your choice, but rather a suggestion. I went with the lighted switches on my dash. That way I know what is on and what is off. It seems to be a neater arrrangement for me. Just a thought. I picked them up at O'Riely's auto parts. They come in red and green.
Bill
I am not knocking your choice, but rather a suggestion. I went with the lighted switches on my dash. That way I know what is on and what is off. It seems to be a neater arrrangement for me. Just a thought. I picked them up at O'Riely's auto parts. They come in red and green.
Bill
Attachments
Last edited:
Alex Hirsbrunner
Lifetime Supporter
Thanks Bill,
Any pics of the evap install would be great! With respect to the heater, If I ever need to drive it on a cold day, I plan on counting on the big heater behind the firewall") .
.
I was however, thinking about defrost. I really don't want to deal with running water hoses into the cockpit and I recall a friend in high school having a car (a VW squareback maybe?) with an electric element that consisted of grid of nichrome wires that was used for this purpose, because either the original heating system didn't work well enough or it was just rusted way (more likely). Given the time frame and our location - Late 70's Chicagoland , I bet it came from JC Whitney/Warshawski. I may try to pursue this route if I can find a 12V element that there is enough room in the RCR to put inline in the duct(s) to the defrost vent on the dash.
Best Regards,
Al
Any pics of the evap install would be great! With respect to the heater, If I ever need to drive it on a cold day, I plan on counting on the big heater behind the firewall
.I was however, thinking about defrost. I really don't want to deal with running water hoses into the cockpit and I recall a friend in high school having a car (a VW squareback maybe?) with an electric element that consisted of grid of nichrome wires that was used for this purpose, because either the original heating system didn't work well enough or it was just rusted way (more likely). Given the time frame and our location - Late 70's Chicagoland , I bet it came from JC Whitney/Warshawski. I may try to pursue this route if I can find a 12V element that there is enough room in the RCR to put inline in the duct(s) to the defrost vent on the dash.
Best Regards,
Al
Bill-
I do plan on using an engraved panel on the left side. I was just excited about completing the dash (FINALLY!!)
Al-
For the defrost, I'm simply going to use the warm setting on the AC thermostat. I have no plans to plumb the heater lines. I'm using the bi-level function to use all three outlets on teh evap.
Bill D
Ian Anderson
Lifetime Supporter
Alex / Bill
Not to hijack your thread but there are 12v heater demister units available over here. See my build
http://www.gt40s.com/forum/showthread.php?t=17398&page=3
Page 3 down the bottom
I bought them from NF auto
http://www.nfauto.co.uk/cbs_products4.htm £22 each
They are rated at 170 watts each if memory serves correct.
Ian
Ron Earp
Admin
ahirsbrunner said:Thanks Bill,
I was however, thinking about defrost. I really don't want to deal with running water hoses into the cockpit and I recall a friend in high school having a car (a VW squareback maybe?) with an electric element that consisted of grid of nichrome w
Hey Al,
The RF had a pretty easy way to do it. Simply weld a bung into the pipe under the heater area and connect a bung to the nipple. Uses existing pipes already running in the area and all you need to do is drill the channel to access lines.
On the other hand, I heard from one person the water didn't flow worth a damn out of those nipples on the RF car and were useless.
Ron
Alex Hirsbrunner
Lifetime Supporter
Thanks everyone for all the defrost related tips. While on that subject, has anyone purchased a reproduction defrost louver panel for their RCR dash and did it fit?
I seem to remember MDA and some others offering this item in their parts list but wasn't sure it was a direct interchange.
Best Regards,
Al
I seem to remember MDA and some others offering this item in their parts list but wasn't sure it was a direct interchange.
Best Regards,
Al
I had planned on doing my heater the RF way but had been wondering how effective it was. I was concerned that there would not be enough pressure drop across the radiator to provide a driving head for the heater. Ron's post tends to confirm that as an issue. I hate to run heater lines from the water pump but I also would not want to add an orifice to the main heater lines to increase the pressure drop on the radiator. I wonder if someone makes a small electric pump that could drive the coolant to the heater.
Bill D said:Yes they do. Ford makes a remote mount water pump. I can get the p/n tonight and PM you the info
Bill, would it be possible for you to post the p/n on the forum? This is one issue I've been wrestling with as I "dream and scheme" and that information would be appreciated.
Thanks!
Doug
Sure thing guys. Here is the scoop:
Electric water pump
M-8501-L54
- Production 2003 F-150 Lightning intercooler coolant circulation pump
- Inlet and outlet hose connection is 19mm/.75" (use a reducer for the 5/8" heater hose outlets)
- Can be used in many coolant pumping applications
Cheers
Bill
Electric water pump
M-8501-L54
- Production 2003 F-150 Lightning intercooler coolant circulation pump
- Inlet and outlet hose connection is 19mm/.75" (use a reducer for the 5/8" heater hose outlets)
- Can be used in many coolant pumping applications
Cheers
Bill
It had not occurred to me to use an intercooler pump. I would think that would flow about the right amount of coolant.
I will probably plumb mine RF style without the pump and see if I get enough heat. If I don't it should be pretty easy to add that at a later date.
I will probably plumb mine RF style without the pump and see if I get enough heat. If I don't it should be pretty easy to add that at a later date.
Similar threads
- Replies
- 53
- Views
- 7K
- Replies
- 16
- Views
- 1K
- Replies
- 21
- Views
- 4K