Alex's SLC build thread

Alex,

Was looking at my pictures and it jogged my memory. I also had to cut out the center section of the tub over the center spine to allow the tub to fit all the way down.

1727139093230.png
 
Alex,

Check your openings at the floor of the tub. If I remember correctly I had to trim mine at the back to get the tub to sit all the way down. The factory does a rough cut on these and they may need to be trimmed cleanly.
thanks Joel and Kurt!
I was thinking cutting more, it is good to know you had to do that. I only cut the "floor" of the tub, so i might have to cut a little more on the "sides" to move the tub down.

interesting you had to cut the center. Well this is a big job to get to the tub so it will be a week end activity :)
 
after cutting and cutting the tube at the bottom to lower it, I still had the issue. It looks like the dimension of the tube and the body are not matching. The issue is the dimension of the bulk/roof panel compared to the top portion of the spider, and clearly more in the passenger side than the driver side.
I finally was able to get a descent fit by cutting more on the door opening then "stretch" the spider over the roof panel, also installing screws o keep it in place. I will replace the screw with something more discrete later, but for the moment I need these bog washers!

before:
1730296197238.png

after:
20241027_173307.jpg20241027_173316.jpg

finally fitting properly:
20241027_175544.jpg20241027_175336.jpg20241027_175325.jpg
 

Attachments

  • 20241027_175349.jpg
    20241027_175349.jpg
    560.1 KB · Views: 87
  • 20241027_175341.jpg
    20241027_175341.jpg
    532 KB · Views: 92
and to have a win on something this week end:
20241027_144535.jpg

I know, it is early, but at least it was successful! It's now covered wit tape!
next step, installation of the new steering rack so i can try to center the body before bolting the tube to the chassis.
Still looking for information on th eposition of that rack!
 
after cutting and cutting the tube at the bottom to lower it, I still had the issue. It looks like the dimension of the tube and the body are not matching. The issue is the dimension of the bulk/roof panel compared to the top portion of the spider, and clearly more in the passenger side than the driver side.
I finally was able to get a descent fit by cutting more on the door opening then "stretch" the spider over the roof panel, also installing screws o keep it in place. I will replace the screw with something more discrete later, but for the moment I need these bog washers!

before:
View attachment 143353

after:
View attachment 143346View attachment 143347

finally fitting properly:
View attachment 143352View attachment 143351View attachment 143350
Alex,

It looks like you have verified the doors fit. That is good. I would suggest doing a rough fit and checking the front and rear clams. If that all looks good I would call it good. I can help you out with that if you are stilling plan to be working on things this coming weekend.
 
@Alexr59 I didn’t read everything just the last few post so I may be stepping out of line here, but I noticed that you’ve got the tub mounted and the cut outs for your race belts but wanted to say remember to put your race belts in before you get everything mounted because the car I bought did not have them mounted. They didn’t even have the holes cut out!! It was a royal PITA to cut out the holes for the belts and figure out how to snake the belts around the bar leaving the tub intact.
 
Alex,

It looks like you have verified the doors fit. That is good. I would suggest doing a rough fit and checking the front and rear clams. If that all looks good I would call it good. I can help you out with that if you are stilling plan to be working on things this coming weekend.
Sounds good Kurt !
 
@Alexr59 I didn’t read everything just the last few post so I may be stepping out of line here, but I noticed that you’ve got the tub mounted and the cut outs for your race belts but wanted to say remember to put your race belts in before you get everything mounted because the car I bought did not have them mounted. They didn’t even have the holes cut out!! It was a royal PITA to cut out the holes for the belts and figure out how to snake the belts around the bar leaving the tub intact.
For sure! I will remove the body after again. I was trying to fit the body to see the clearance for piping and harness... still have some electrical work to do and run my AC line after that. But thanks for the heads-up
 
Update from last week end: I got help from @Hoffkm12 to align the front and rear clips to the spider (and the tub).
locators pins are in place, but I have no picture
20241103_174827.jpg
next step is putting the hinges from front clips, rear clips and doors
For the rear clips, I have these parts. the brackets look different that what I have seen, I am assuming it is an update? or I am missing something?
20241106_191042.jpg

Other question: where can I find the template to cut the front door hinges?
 

Ken Roberts

Supporter
Those rear hinge brackets haven't been used in years. The rear hood couldn't be opened very far. Surprised they even had them in stock.
 
Thank you guys. That's what I was thinking. I received my kit this year so I should have the good hinges. I will reachbput to RCR.
 
Waiting on feedback on my rear hinge from RCR.

This week end I worked on the front and rear clips locks.
Placed the first one, made a template to install the other side and after drawing it on the other side, something was not right. The 2 vents are not identical and the driver side is bigger that the passenger. Same issue with the front lock. but overall results is nice anyway:
Rear:

20241109_164122.jpg20241110_083057.jpg20241110_084424.jpg20241110_092249.jpg

Front:
20241110_094524.jpg20241110_094528.jpg20241110_103231.jpg20241110_111057.jpg

Started the cut out on the headlight. very hard to get a clean circle! (left is done, right is pre drilled and not finished)
20241110_174721.jpg
 
How do you drill and cut the door hinges? just based and the sharpie's marks ? same for the "holes" under the hood?
 
Alex,

I used the sharpie marks placed by RCR on my spider. Here are some pics of how mine turn out.

2021-01-20 21.50.42.jpg
2021-01-16 16.10.58.jpg

2021-01-16 16.11.01.jpg

2021-01-16 16.11.08.jpg


You are welcome to pull measurements or create a template off of my car if that will help.
 
thank you Kurt. if this is the way to do it, I will do it like that. i am surprise there is no template from RCR for that. thanks for the pictures!
 
headlight cut out are finished and headlight are modified. I now need to modify the fiberglass brackets and attach them to the body.
20241117_115532.jpg 20241117_115527.jpg
I was wondering if anybody found something to "seal" the hella headlight in the hole to avoid debris to enter the headlight from around the hella light?

I also installed the locking pins for front are rear clips, but the holes might need to be drilled bigger/longer after I have the hoods hinges figured out and installed as I am missing the right motion to close them.
20241117_110647.jpg20241117_110641.jpg20241117_110638.jpg

but the fitting is looking not too bad. Again from right to left the fitting is totally different due to the body shape (on side very flat, one side the areas are "curved"

20241117_115543.jpg20241117_115539.jpg
 
I received the correct rear hinges and decided to tackle that last week end. I am still missing parts (checking with RCR) to be able to install them properly (u shhapes bracket and rods), but at least i could make progress.

first issue, the mounting bracket going on the hood is off, the spacing between the small plates is 1 inch to narrow compared to the rear clip
Media (18).jpgMedia (17).jpg
instead of cutting and welding, I decided to bend the small plates
Media (15).jpgMedia (14).jpg
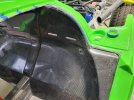
then i mounted the bracket at the as forward as possible on the rear clip, to realize that in this position it is really far from the body bracket and impossible to mount so i had to mount it as much back as possible and cut into the fiberglass of the diffuser (you can see the holes from the first trial....)
Media (10).jpgMedia (9).jpg

now the rod is really pushing against the fiberglass, and the hinges are not able to be aligned at all.
Media (13).jpg
to be able to fit everything, the hinges need to be modified
Media (5).jpg
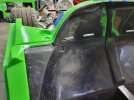
but even this modification was not enough. I installed washers (I will replaced with spacer later) to push the bracket away from the body
Media copy.jpg

it's in place, will need more adjustment but i am waiting for the missing bracket for proper installation before fine tuning the position
Media (11).jpg
 
i also discovered that one side of the rear suspension had the wrong spacers, to big, they are floating on the bolts and mounted with to many washers so the bracket were spreading
Media (16).jpgMedia (12).jpg
any idea if these aluminum washer are available somewhere?

I also received the custom shroud, next week end plan!
Media (6).jpg
 
Back
Top