Ken Roberts
Supporter
I'd recommend tossing the aluminum rod end washers and replacing with steel versions. Search for "ball joint rod end inserts" on McMaster Carr.

I will, I will send you a PM.Alex, I have extra aluminum spacers. Let me know what size and how many you need.
thank you all, I might just order steel, it makes a lot of sense!
.jpg")
.jpg")
.jpg")
.jpg")

.jpg")
.jpg")
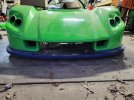
thanks Ken !Also if using the "optional" factory nose hinges ……..these spacers need to be fabricated to accommodate for the deeper scoop of the race splitter.
I have both styles of splitter. I'm just about to start building my wood base for the race splitter. Templates out of cardboard will be designed first. I don't care for the look of visible bolts at the front so I plan to bond it in place with adhesive.thanks Ken !
Yes I am and I saw that on the front hinge discussion.
for the plywood, I didn't realize. Do you have the track splitter? how did you do it?
.jpg")
.jpg")
.jpg")
 (@Jkviper top mount is modified, bottom is pretty fare out, not sure what I will do )
(@Jkviper top mount is modified, bottom is pretty fare out, not sure what I will do ).jpg")
.jpg")
.jpg")
.jpg")
.jpg")
thank you for all the info Joel!Alex,
A few comments.
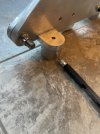
The whole hinge can be moved rearward a bit so the front of the hinge protrudes less. Keep in mind those three holes and backing plate need to line up with body to secure it. So wherever that spot is, is where you want to mount the hinge(Fore-aft position).
As Ken suggested, installing the radiator will set the width of the front compartment and that will then dictate the gap between the pivot plate and body. If it is still too large a gap, have the spacer machined down.
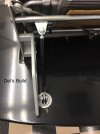
A few builders have used a mixture of epoxy, fiberglass, silica, etc and sandwiched that material in a plastic baggie to make a shim that matches the contour and fills the gap. Check out Dan Carter’s SLC build for how he made his shims. I may build that area of the body up with fiberglass which would add more strength so not sure about my approach yet.
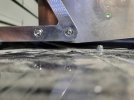
Most builders cut away a circular area on the rear of the splitter. They make sure it clears when the wheels move side to side and when the nose lift is engaged.
Keep up the great work!
.jpeg")
.jpeg")
.jpeg")
.jpeg")
.jpeg")
.jpeg")
.jpeg")
.jpeg")
.jpeg")