
- Forums
- GT40 Replica Manufacturers' Corner
- RCR Forum - RCR40/SLC/917/Superlite Aero
- The SLC Clubhouse
You are using an out of date browser. It may not display this or other websites correctly.
You should upgrade or use an alternative browser.
You should upgrade or use an alternative browser.
Alex's SLC build thread
- Thread starter Alexr59
- Start date
.jpeg")
.jpeg")
.jpeg")
Joel K
Supporter
My last issue is that the hood is touching the door hinges inside when closing, off course right where the centering pins bracket are. more trim needed on the hood or I am missing something?
View attachment 145008View attachment 145009
It looks nice with the doors now!
View attachment 145010
Alex, try a round head bolt.
Joel K
Supporter
Alex, try a round head bolt.
If the round head doesn’t work they make very low profile shoulder bolts. This may not be the exact size you need but an example of another choice…

McMaster-Carr
McMaster-Carr is the complete source for your plant with over 595,000 products. 98% of products ordered ship from stock and deliver same or next day.
Neil
Supporter
Where is the round head bolt?+1 to round head bolt. I also had to trim the hood flange area down on mine quite a bit:
View attachment 145011
it's not in that picture (that pic was just to show how much I had to trim my hood). The round-head bolt is what Joel was talking about: the hinge pivot bolt that protrudes into the path of the hood closing.Where is the round head bolt?
Thank you for the feedback. round head bolt will help, but it looks like i need to trim to as shown on Mark picture. at least i know it is not only me! ")
I like the ultra low profile bolt, if the round button head doesn't work, it will be a good solution (I have the round head in stock lol)
.jpeg")
.jpeg")
I like the ultra low profile bolt, if the round button head doesn't work, it will be a good solution (I have the round head in stock lol)
Joel K
Supporter
Thank you for the feedback. round head bolt will help, but it looks like i need to trim to as shown on Mark picture. at least i know it is not only me!
I like the ultra low profile bolt, if the round button head doesn't work, it will be a good solution (I have the round head in stock lol)
View attachment 145012View attachment 145013
Alex,
It’s great you are making all these posts. I never knew this was a potential thing to look out for. But now I know. Thanks!
Alex,
Just as further confirmation, I had to clear my front clam same as Mark. I used a socket head should screw for my door hinge pivot point which allowed some more clearance than a head hex bolt but not as much as a button head cap screw.


Just as further confirmation, I had to clear my front clam same as Mark. I used a socket head should screw for my door hinge pivot point which allowed some more clearance than a head hex bolt but not as much as a button head cap screw.
it looks like i have some room for trimming!
.jpeg")
Alex,
Just as further confirmation, I had to clear my front clam same as Mark. I used a socket head should screw for my door hinge pivot point which allowed some more clearance than a head hex bolt but not as much as a button head cap screw.View attachment 145014View attachment 145015
this week end work, trim of the hoods as close as possible to the pin receiver, but i nee low profile head to confirm first.
I also started the headlight installation, by gluing with epoxy glue the fiber glass pieces. you can see in the picture, the fiber glass pieces were not numbered properly and it took me some time to figure it out. (1 was the 3, and 3 was the 1).
My plan A was to mount the light directly in the fiberglass, but it didn't feel right as the adjustment screw brackets were not sitting properly and easy to pop out and fiberglass broke
.jpeg")
Plan B: struggle to cut aluminum brackets (nothing cut aluminum easy in my garage), mount the lights on the brackets and then rivet the bracket on the fiberglass (in case I need to move it to adjust the position). Overall it is pretty sturdy and easier to center the light with the bracket on the fiberglass pieces before riveting.
.jpeg")
.jpeg")
.jpeg")
.jpeg")
.jpeg")
Also very hard to align the right side light due to the body fiberglass shape, the light is angle (rotation) a couple of degrees, I could not get the "bottom" exactly at the bottom, even after trimming so much on the light.
.jpeg")
first look:
.jpeg")
.jpeg")
.jpeg")
I also started the headlight installation, by gluing with epoxy glue the fiber glass pieces. you can see in the picture, the fiber glass pieces were not numbered properly and it took me some time to figure it out. (1 was the 3, and 3 was the 1).
My plan A was to mount the light directly in the fiberglass, but it didn't feel right as the adjustment screw brackets were not sitting properly and easy to pop out and fiberglass broke
Plan B: struggle to cut aluminum brackets
(nothing cut aluminum easy in my garage), mount the lights on the brackets and then rivet the bracket on the fiberglass (in case I need to move it to adjust the position). Overall it is pretty sturdy and easier to center the light with the bracket on the fiberglass pieces before riveting.Also very hard to align the right side light due to the body fiberglass shape, the light is angle (rotation) a couple of degrees, I could not get the "bottom" exactly at the bottom, even after trimming so much on the light.
first look:
Ken Roberts
Supporter
Keep in mind that the low beam is a projector beam. When you mount it remember to keep it orientated perfectly level or the horizontal cutoff pattern projected on the road will look weird.
Do you mean the lights in the exterior on in the middle?Keep in mind that the low beam is a projector beam. When you mount it remember to keep it orientated perfectly level or the horizontal cutoff pattern projected on the road will look weird.
for the exterior lights, I trimmed a lot on the lamp itself, and I will be able to mount them exactly at 0 degrees.
for the passenger middle one, it was impossible as the black insert/bracket holding the screw is hitting the fiberglass of the body and I couldn't remove 5 mm of fiberglass.
moving the aluminum bracket further out was not enough to clear that clip/bracket anyway ( it has to be a difference in shape of the fiber glass from right to left)
Now is it impossible to see it is a little off, I am looking at it on my knees for 5 minutes to see the 1 or 2 degrees off.
Ken Roberts
Supporter
I'm talking about the front low beam headlights that will be mounted in the outer position. You haven't installed them yet.
ok, clear. I will make sure they are perfect. I had to trim a lot on these ones to be able to clear the body, much more than just the screw bracket.I'm talking about the front low beam headlights that will be mounted in the outer position. You haven't installed them yet.
Alex,
If you are still are working on your brackets after I installed mine I ordered these. I will be updating mine with these when I blow it all apart for paint.

If you are still are working on your brackets after I installed mine I ordered these. I will be updating mine with these when I blow it all apart for paint.
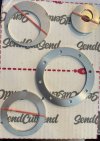
how much was it Joel ? how fast did they ship?I’m behind you guys on this step, but these look similar to some parts I ordered from Sendcutsend. Could use fusion 360 and draw them out have have them precisely laser cut.
Similar threads
- Replies
- 3
- Views
- 2K
- Replies
- 19
- Views
- 1K