A.J.'s SL-C build thread

Excellent pics! I appreciate the input. If I had the floor space I wouldn't be hanging it in the air. I already have the front and rear clips in the house, standing on end. There's nowhere I can put the spider in car position. If I put in cross bars while its in the air, I'd need to wear a football helmet while working on the car :thumbsdown: But what you're saying is "it matters", and I have to think of a way to heed that. Maybe I'll set it down on the chassis each night. I prefer simple solutions.

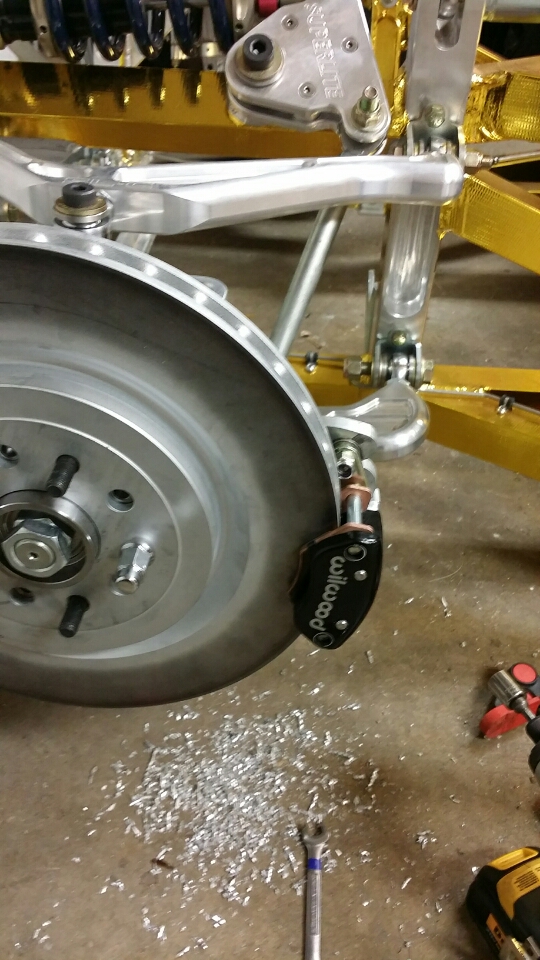
I wasn't sure if my son was going to view the car project in a positive light, and have been careful not to over-do it and cause him to resent it. Well, to my delight, each evening this week he has come out in the garage and asked "what can I do?" He really liked the red paint I bought for the calipers, so I decided to make that his project. So for the rest of his life, he can look at the red popping out from behind the black wheels, smile, and tell his friends "I did that" :thumbsup: Last night he began sanding off the "Chevrolet" logos. I'm continuing with the bling:

2015-05-27-01.jpg


A.J.
 

Howard Jones

Supporter
The fact that your son is helping is worth more than the whole thing will ever be!
Building one of these cars is a perfect example of a all in one project manager/ foreman, skilled worker. Sourcing stuff, learning new processes, budget control, commitment, leadership, and teamwork. A little smidgen of each along the way as it comes up and he'll learn more from you by watching than you could ever "tell" him.

Another thing he can share is the new friends you will meet along the way. Some of the nicest people I know are hot rod people. In general they are helpful, nice, resourceful, and generally well grounded people. Great role models to point out to a son IMHO.

I can't think of a more valuable way to spend your time with your son.

Congratulations, Anything I can do to help, PM me. Howard
 
Thanks Howard. And Eric. My son and I have been through a lot in the last 2 years. It wasn't a given that he would get involved. It has been a blessing. I entered the world of Harleys last year, and he was real negative on that. Until he saw it (Night Rod). Then he wanted to ride it. Immediately. Now he's hooked. The people we have come across have shattered his preconceptions, similar to what you mention about the hot rod crowd. Guys who he prejudged as being rough or not friendly come right up and start talking like we're longtime friends. An unexpected benefit.

He's at an age of transition, and is beginning to not only understand what makes me tick, but why. And now he's feeling the pull. On top of everything else, he's also a GoPro enthusiast. I've always been the one taking pictures, and he used to be cranky and avoid all the photos. Once the GoPro came along, he turned into a camera whore. And it benefits me, too. No way I would be able to get shots like this:

2015-05-29-01.jpg


2015-05-29-02.jpg


I have aspirations of a thorough documentation of the post-build life with the SLC. Video and stills. I expect he will be a big part of that. I couldn't get enough of the SLC when I was in the 10 year pre-build dream stage. I'll see if I can't rectify that for others...
 
Finally finished the gold foil last night. Very tedious, but I definitely enjoyed putting it on. Its actually far more forgiving to apply than I feared. I had a large piece cut for one of the frame rails double back on itself on a 6" span, sticky sides together. The adhesive is similar to duct tape, and it's pressure sensitive. My heart sank, but I was able to separate it and salvage the piece. That wound up being important, because I was using scraps by the end to get the coverage I wanted. If I had to recut that piece I would have been short. I set aside just enough for a close out panel behind the fuel tank and the upper bulkhead. I wasn't sure if the 36 sq ft was going to be enough to get everything, but it just barely was. In the transmission area I had to only do the "important side" rather than wrap everything.

I noticed there are drain holes on the bottom of the frame rails. For those who have done any kind of wrapping on the rails, make sure you open up those holes. They're small, but if water condenses in the rail, it will loosen the adhesive over time.

2015-06-051.jpg
 
I assembled my seats with Sparco sliders and a tilt function.

2015-06-1301.jpg


And here it is leaned back. I lightened the picture to show the Sparco release lever for the sliding seat

2015-06-1302.jpg


I put the tub, roll bar, body and door back on the car to be able to judge just where I needed the seat to go. The steering column seemed off to the right a bit. I figured the tub was holding me outboard a bit. But I trimmed the dash and put it in for the first time :thumbsup: and sure enough, it wasn't centered to the gauge cluster. So I bumped the column over and the wheel was right where it felt great. The seats pivot at the back same will pin at the front with a quick release. I wasn't sure how much depth and engagement I would need. Now that I know, I can go ahead and order them. The reason for the tilt is for helmet clearance at the track. I don't like it laid back, and now it will only be that way at the track. I also put some threaded rod across the bottom of the seat at the front to help keep it rigid. I left a little clearance under the seat for sound deadening and carpeting.

A.J.
 
Lots of work going on in my garage. Most of it has been mundane, with lots of re-doing things. I'll post more details once I get into things that are more interesting.

I have to send a huge thanks to Fran, Vicki, Brittany and Brandon at RCR. They have been a huge help to me and very accommodating when I need something or have questions. Brandon even let me use his tools! Also a huge thanks to Allan. I've bugged him quite a bit with random questions.

I've been documenting the entire build with video. This is only a small portion...it has taken me a long time just to get this right. It's a time lapse run at 6000%. I'm running out of space with all theses GoPro files. I'm probably pushing 1.5TB. This video only represents about 1/4th of it....I've been re-processing it several times (Adobe Premiere) learning the software as I go. It takes about 30 hours to complete. After this last go-round, I noticed a little trial video of changing the springs on my Dart is included. I'm not re-doin the file AGAIN to get that out! :-)
https://youtu.be/m6PUjjcc-to
 
Hey A.J. Looks like your moving right along. Good job, stay after it have fun. I like the gold heat shield. Looks like that was real fun. When are you going to drop the engine and tranny in it? Keep posting.
 
Hey AJ, how tall are you?

I mention this because I have a larger torso and I'm 6'1 200lbs. I have the seat as low as it can go and as far back as it will go and with a helmet I have to scrunch down low in the seat to fit properly. Did you measure seat/roof clearance before you made these up?

If you don't plan on using a helmet, disregard me. It adds 2" at least.

~Eric
 
I'm just under 6'. But I'm evenly proportioned, so my torso isn't longer or anything. I did place the seat in the cab and had the doors in place. I tried placing the interior door trim in as well but they're oddly shaped and don't quite make sense to me how they fit. The issue of head clearance is why I made the seats recline. Or tilt. It appears I will have no issues with clearance without a helmet. With a helmet I will need extra room, so I can lean the seat back. I optimized everything as far as I can go. The bottom of the seat, even though it's on Sparco sliders, is off the floor just enough to allow for sound deadening and carpet. Maybe 1/4". The recline is as far as it will go with the existing seat bracket - I run out of material to pin to if I recline any more. If I need more head room than this, I will need to make new brackets. But I seem to have plenty of room.

I was back and forth on the adjustable pedals. Final decision was "no". Then i got the seat in place and reclined it, and noticed how much the seat moved my thighs up, and my feet location went aft. So back to "yes" on Fran's slider. There appears to be interference issues with the wing nuts that secure the position of the slider. The pedal assembly keeps the front ones from rotating. The rear wing nuts are free to rotate, but will be extremely difficult to manipulate when the assembly is installed. Also, the assembly I got didn't seem to have the right knob on it. Hard to explain. But I decided it would be far easier to use a linear actuator to control the position. Parts are on the bench waiting to be fabricated. Hopefully will get to that this week.
 
When are you going to drop the engine and tranny in it? Keep posting.

I have the engine but the trans is still on backorder. Not sure when it is due, but I'm not ready for it. I'm so space limited right now that it's convenient not having it.

I'm piecing the body together, getting everything to line up. I gave it a crack once before and the wheels weren't centered in the holes, the front splitter wasn't going where it needed to, and other issues. I got the body pins and rear aerocatch latches installed, and what a difference! I put extra screws in the body up front to ensure there is no movement at all around the hinges, and when I remove the body & put it back on, it has a better chance of going back to exactly the same spot.

The key to aligning everything is having the pins in place.
 
I got the doors fit nicely, including the door shocks. I like how the shocks mount inside the body, but the ball stud contacts the inside of the hinge and limits upward travel. So I added a little extension to move the ball stud location forward, which allows full hinge extension yet remains hidden.

2015-07-31-05.jpg


This is the difference in the amount the door is allowed to open. The left door is fully extended with the modified hinge, the right door has the ball stud at the original location
2015-07-31-02.jpg


This is with both fully extended
2015-07-31-03.jpg


This is where I located the lower ball joint. BE SURE not to put any "preload" on the cylinder. I thought it sounded like a good idea so there wasn't any slop when the door was fully open. But it made it next to impossible to get the cylinder off and on. I relocated the position of the ball stud so its exact.
2015-07-31-01.jpg

2015-07-31-06.jpg


I had no idea how the hinges work until I got the car, so I figured I'd post this to show what things look like from the inside. This is the right side door.
2015-07-31-09.jpg


The park brake caliper and brackets that I fabricated:
2015-07-31-07.jpg

2015-07-31-08.jpg

The caliper isn't rated for rotors as thick or with a diameter as large as they are (Camaro SS brakes). So I made spacers to spread the caliper, used longer bolts, and had to modify 2 spacers.

The calipers were gray with "Chevrolet" and small "Brembo" logos. That wouldn't do. My son did the duties on the rattle can (VHT brand paint, including clear coat).
2015-07-31-04.jpg


A.J.
 
Cool design, including sealing the LA so heat from the rad area doesn't leak in. I think that's the best design I've seen for moving pedals in the SLC.
 
Looks great, what actuator did you use? What did you use for a switch that reversed it's direction like the lift switch?
 
Back
Top