
You are using an out of date browser. It may not display this or other websites correctly.
You should upgrade or use an alternative browser.
You should upgrade or use an alternative browser.
CANAMSA - SA stratch build
- Thread starter Fred W B
- Start date
Brian has managed to invert the pics for me. Thanks for that. Neil, the parts are painted immediately, I just happened to be nearby at that stage. The small parts are being done first
The garage looks so empty with the chassis gone. I disassembled the build table the chassis has stood on for so long and used some of the material to make a pair of chassis trestles


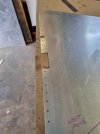
Very exciting weekend for me! Got the chassis and subframes back from paint and I am very happy with it. The colour is Basalt grey RAL 7012. Before painting the main chassis and rear section weighed about 119 kg (260 pounds), the zinc rich primer and polyurethane top coat added about 2 kg (4.5 pound).
I bolted the engine engine adapter / mount plate to the rear chassis section and mated that to the main chassis section to check it still fitted. Had to relieve some paint thickness in the mating faces. Started to remove the threaded plugs and checked that a bolt turned nicely by hand into all the bushes. Currently busy with that as I am having to retap most of them.

I bolted the engine engine adapter / mount plate to the rear chassis section and mated that to the main chassis section to check it still fitted. Had to relieve some paint thickness in the mating faces. Started to remove the threaded plugs and checked that a bolt turned nicely by hand into all the bushes. Currently busy with that as I am having to retap most of them.
Last edited:
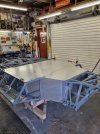
Took some record pictures of the complete chassis. Not shown are 2 diagonal bars that bolt into the front of the side sill structures


Last edited:
A view of the engine bay showing various brackets for such as handbrake cables, fuel tank and lines, brake lines etc . The small structure in the centre of the cockpit that supports the gearshift is slight offset from centre to give the driver more elbow room.

Last edited:
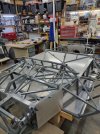
Various body mounting and other subframes

And finally the roll bar structure. I bolted in the support for the driver head rest just because it could finally be a part that stays on once and for all. First time I have used locking nuts on the project.

Once I had finished cleaning out all the internal threads I could make a start on the aluminium panelling. Although this is a space frame chassis I want to panel the cockpit internal area so that it resembles a monocoque construction. I intended to fit the floor first but as I turned the chassis I realized access to work on the internal side panels is much better with the chassis on its side, and before the floor is fitted.


I make paper templates to aid in cutting reliefs around frame members and brackets. Rough fit it first and then tape bits on to get the final fit-up.

I had some drill templates made with several edge offsets so that I could easily drill the rivets holes equidistant.


I make paper templates to aid in cutting reliefs around frame members and brackets. Rough fit it first and then tape bits on to get the final fit-up.
I had some drill templates made with several edge offsets so that I could easily drill the rivets holes equidistant.
Attachments
Last edited:
In some places I am riveting 19 x 19 extruded angle to the chassis to give me a flange to secure to. I figured out a cheat to be able to set rivets at the bottom of a 19 mm U channel with the tooling I have. Just 4 off M4 nuts taped together to make a spacer.


Last edited:
In other news, I had previously bought bolts with suitable grip lengths to suit the suspension attachments. These needed to have the threaded length shortened. Once this was done I had them plated as part of a batch of sundry small parts and other fasteners. 10 kg (22 pounds) total.


Back on the chassis paneling, my friend who does the sheet guillotining and press braking suggested that we try putting some stiffening beads in some of the panels. I like how they look.

Currently I have almost finished making the left hand side inner panels, the right hand side will be quicker as they are a mirror image of the left.


Back on the chassis paneling, my friend who does the sheet guillotining and press braking suggested that we try putting some stiffening beads in some of the panels. I like how they look.
Currently I have almost finished making the left hand side inner panels, the right hand side will be quicker as they are a mirror image of the left.
Last edited:
At some places I want to do an overlap joint so am experimenting with some makeshift tooling to make a panel thickness joggle.


Got some paneling done. On the foremost bulkhead I made things difficult for myself by wanting to close off on the outside face of the chassis framework rather than on the inside. Instead of just one panel across the bulkhead it had to be in sections. All this to save 25 mm of possible pedal travel. The joggle detail worked well.


Last edited:
Got the internal side panels fully fitted

It’s been a while, I’ve been having a “riveting” time doing the cockpit internal paneling.
I found some scrap polyurethane foam to insulate the rear bulkhead, this had to be shaved down to 19 mm thickness so it fitted nicely between the diagonal tube members before I fitted the front panel of the rear bulkhead.
I made a closing panel for the gap between the top of the chassis and the rail that supports the forward return of the body rear section. This assembly has to be removable; the line of M4 bolts screw into tapped holes in a 5 mm aluminum flat bar behind the panel. I prefer not to use rivet nuts in thin panels.
I mocked up where I wanted to put the seat side bolsters in MDF. I had put the seat belt mounting points 410 mm apart, and I decided I wanted the side bolsters 380 mm apart. This is a comparable size to a traditional 7 which I fit into well. Meant I had to make a recess to get the seatbelts bolted to the brackets. I could have put spacers behind the panel but I liked the idea of tucking them back a bit. I have weldnuts in the chassis so if I use a bolt with a nut on the outside of the panel but inside the seatbelt attachment I can tighten the assembly and still have the seat belts pivot on the mounts. I will used button head bolts here. There are 2 holes per mount to allow options for the lap belt position and / or to use a single seater style 6 point harness.
I made things difficult for myself by wanting to put the side bolster panels on top of the seat bases, rather than having full vertical side pieces with the seat base between them. I did it this way as I had a thought than any future owner of the car might want a wider seat space, and this could be done by removing the side bolsters or fitting some new ones further out. So I bent some 2 mm aluminum to form the seat bases the full width between the cockpit sides and the center console. Everything else is 1.2 mm material. The bolsters are joined to the bases and rear panel with 45 degree fillet pieces. These needed quite some fitting up at the mitered joints, particularly around the seatbelt pockets.


I made things difficult for myself by wanting to put the side bolster panels on top of the seat bases, rather than having full vertical side pieces with the seat base between them. I did it this way as I had a thought than any future owner of the car might want a wider seat space, and this could be done by removing the side bolsters or fitting some new ones further out. So I bent some 2 mm aluminum to form the seat bases the full width between the cockpit sides and the center console. Everything else is 1.2 mm material. The bolsters are joined to the bases and rear panel with 45 degree fillet pieces. These needed quite some fitting up at the mitered joints, particularly around the seatbelt pockets.
So I completed all this detail, but then when I first sat in the seats I found that I had made a fundamental mistake by putting the upper bolsters alongside your torso perpendicular to the rear bulkhead. Any significant sideways inertia would force your ribs against the edges and injure them. As an ex karter this should have been obvious to me but sometimes you don’t see the wood for the trees. So I deriveted all of the upper bolsters and set about changing them to a 45 degree angle and shorter version.


Similar threads
- Replies
- 5
- Views
- 727
- Replies
- 12
- Views
- 875
- Replies
- 11
- Views
- 3K