Water intrusion into the SPF GT40.
This is what I found in over a year and a half working on SPF 2197. Some of the information in this HOW TO article I’ve posted in other threads but hopefully this should cover everything.
This whole thing started with a conversation with Lynn Miner and the problems he had with his car and some of what I will be posting came from his research.
As I see it there are the usually suspects such as the opening around the steering column, etc. those are ease to see and fix. The tough ones are the ones you have to take the car apart to see and get to. Also every pinch seam in the car is a potential place for rust to start, and most of these are in places that are not easy to get to.
As I’m no expert at this I’m sure other people will have better ways of doing this but I’m very happy with the outcome. I’m going back and start at the beginning and this will take more than one post but here it goes.
The Pinch Seams.
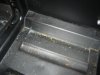
I’m not a big fan of the way cars are made where pinch seams are spot wielded together but it is what it is. After seeing pictures of many of the original cars rusted very badly in the sponson and tub area’s I decided that was where I would start. I barrowed some undercoating that Lynn had left over and it turned out to be a stroke of luck. There were two types of undercoating, a waxy one and one that was more like pant but was rubberized. An important aspect of the rubberized pant was that it was an almost exact match to the paint used to paint most of the SPF GT40’s chassis’s. It’s sold by Eastwood’s and is great stuff. I ended up using both types depending on the application.
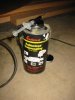
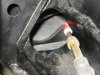
I hope someone finds a better way of doing this next part but I used a standard large medical syringe. At first I tried getting them through medical channels but they can’t sell them to you without a prescription. You can however buy as many as you want from the local feed store. I did end up with a bigger one than the one in the picture but that's what I started with.
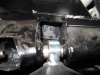
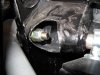
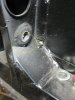
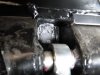
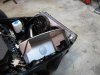
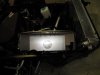
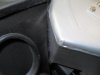
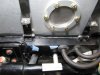
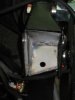
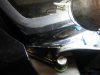
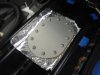
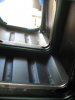
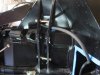
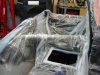
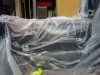
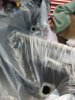
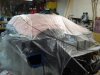
As I knew I was going to waterproof inside the sponson area I started by removing the front suspension and gas tanks which uncovered some very large holes which I’ll talk about later. I first went around the car with syringe and filled every external seam I could find. I mostly worked on the seam the goes around the entire car right at the bottom edge but did every seam I could find. One big one is at the front edge of the tub were the piece of sheet metal is pop riveted on. You have to do the top and the bottom of the seam. I did it more than once as it just kept sucking in the paint. There is also a rubber seal at the top edge just in front of the windshield which I removed, sealed then re-glued into place.
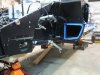
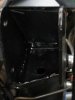
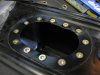
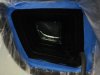
I then did what Lynn had done and drilled small holes into all of the car’s rear compartments that can’t be accessed directly any other way. This included the horseshoe shaped piece that goes around the bellhousing. In my case those areas got treated with the waxy undercoating with the gun and wand Eastwood sells for this job. I did the inside of the sponsons at the same time. Don’t be surprised if it runs out of places that you don’t think it should.
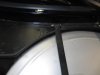
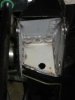
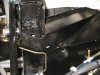
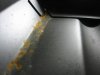
Another place that surprised me was at the lower edge at the front of the foot well. Lynn warned me about this but was still a shock to see the way this area was put together (not very well). Just a little more work on this part would have saved me a ton of time. It’s a big enough issue I’ll be covering this later.
Well this is my first installment hopefully the pictures will fill in for what I didn’t say.
This is what I found in over a year and a half working on SPF 2197. Some of the information in this HOW TO article I’ve posted in other threads but hopefully this should cover everything.
This whole thing started with a conversation with Lynn Miner and the problems he had with his car and some of what I will be posting came from his research.
As I see it there are the usually suspects such as the opening around the steering column, etc. those are ease to see and fix. The tough ones are the ones you have to take the car apart to see and get to. Also every pinch seam in the car is a potential place for rust to start, and most of these are in places that are not easy to get to.
As I’m no expert at this I’m sure other people will have better ways of doing this but I’m very happy with the outcome. I’m going back and start at the beginning and this will take more than one post but here it goes.
The Pinch Seams.
I’m not a big fan of the way cars are made where pinch seams are spot wielded together but it is what it is. After seeing pictures of many of the original cars rusted very badly in the sponson and tub area’s I decided that was where I would start. I barrowed some undercoating that Lynn had left over and it turned out to be a stroke of luck. There were two types of undercoating, a waxy one and one that was more like pant but was rubberized. An important aspect of the rubberized pant was that it was an almost exact match to the paint used to paint most of the SPF GT40’s chassis’s. It’s sold by Eastwood’s and is great stuff. I ended up using both types depending on the application.
I hope someone finds a better way of doing this next part but I used a standard large medical syringe. At first I tried getting them through medical channels but they can’t sell them to you without a prescription. You can however buy as many as you want from the local feed store. I did end up with a bigger one than the one in the picture but that's what I started with.
As I knew I was going to waterproof inside the sponson area I started by removing the front suspension and gas tanks which uncovered some very large holes which I’ll talk about later. I first went around the car with syringe and filled every external seam I could find. I mostly worked on the seam the goes around the entire car right at the bottom edge but did every seam I could find. One big one is at the front edge of the tub were the piece of sheet metal is pop riveted on. You have to do the top and the bottom of the seam. I did it more than once as it just kept sucking in the paint. There is also a rubber seal at the top edge just in front of the windshield which I removed, sealed then re-glued into place.
I then did what Lynn had done and drilled small holes into all of the car’s rear compartments that can’t be accessed directly any other way. This included the horseshoe shaped piece that goes around the bellhousing. In my case those areas got treated with the waxy undercoating with the gun and wand Eastwood sells for this job. I did the inside of the sponsons at the same time. Don’t be surprised if it runs out of places that you don’t think it should.
Another place that surprised me was at the lower edge at the front of the foot well. Lynn warned me about this but was still a shock to see the way this area was put together (not very well). Just a little more work on this part would have saved me a ton of time. It’s a big enough issue I’ll be covering this later.
Well this is my first installment hopefully the pictures will fill in for what I didn’t say.
Attachments
-
 IMG_3946.jpg25.2 KB · Views: 564
 -
 IMG_4065.jpg44.4 KB · Views: 591
 -
 Camera 3-24-08 001.jpg15.5 KB · Views: 584
 -
 Camera 3-24-08 002.jpg16.5 KB · Views: 501
 -
 Camera 3-24-08 006.jpg33.9 KB · Views: 539
 -
 Camera 3-24-08 007.jpg41.4 KB · Views: 528
 -
 Camera 3-24-08 009.jpg15.2 KB · Views: 484
 -
 Camera 3-24-08 013.jpg52.2 KB · Views: 532
 -
 IMG_4360.jpg36.4 KB · Views: 515
 -
 IMG_4357.jpg27.3 KB · Views: 538
 -
 IMG_4362.jpg23.4 KB · Views: 515
 -
 IMG_4364.jpg29.5 KB · Views: 525
 -
 IMG_4367.jpg16 KB · Views: 481
 -
 IMG_4382.jpg34.7 KB · Views: 504
 -
 IMG_4383.jpg30.1 KB · Views: 500
 -
 IMG_4390.jpg48.1 KB · Views: 523
 -
 IMG_4391.jpg39.2 KB · Views: 423
 -
 IMG_4394.jpg25.6 KB · Views: 452
 -
 IMG_4402.jpg39.3 KB · Views: 497
 -
 IMG_4399.jpg23.9 KB · Views: 491
Last edited: