David G 69 Gulf SPF build begins.

Randy Folsom

Supporter
Now that the front of the engine is figured out I will remove the engine from the stand and mount the flywheel and the the bellhousing and zero runout the bellhousing then install the clutch assembly. I want to send the bundle of snakes out for jet hot coating but think I need to test fit it first and make sure they clear the upper crossmember first.
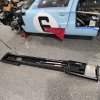
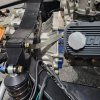
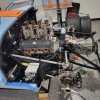
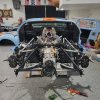
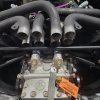
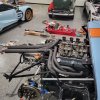
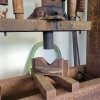
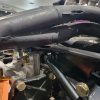
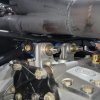
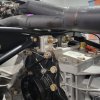
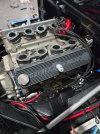
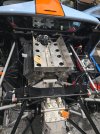
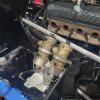
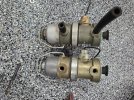
David, did you send the exhaust to Jet Hot. I asked a few different vendors how they coat the inside. The only one that would not tell me was Jet Hot. Claimed it was a trade secret. The others all said they cap the ends and swirl. That is also how Ceracoat recommends. It’s certainly a lot less expensive. I am also looking at Eastwood’s internal coating. They provide a 2’ hose with a 360^ nozzle. Cheers, Randy
 
I had a neat piece of the puzzle show up almost a year to the date of the delivery. And I plan on registering it as a 1969 so I stumbled across this fitting 69 Florida license plate. My chassis number is P1176 . 50 year Anniversary of P1075.
I love the matching “Gulf” guitar David. I’ve seen them on the Safir website and have to admit they’re tempting, but my taste runs more toward acoustic type guitars… :cool:
 
Got my quick Jack's 6K and they work perfect. This is only one click to the first safety lock. Motor is off the motor stand and ready to index the bellhousing. Test fitting the engine tomorrow.


View attachment 136882View attachment 136883View attachment 136884View attachment 136885View attachment 136886
Hello David, I am planning on buying a quick jack for my SPF GT40 and I was wondering if you could tell me the make and size of quick jack you are using? I understand that there are a few sizes available. I am also particularly interested in where you have positioned them under the GT40 so as not to cause any damage to the bodywork or chassis? For example, do you use rubber blocks between the chassis and jack? Any info you can provide will be appreciated.
Thank you.
Robbie.
 

Darius Rudis

Supporter
QuickJack 5000SLX (from 2017). Comperable is https://www.quickjack.com/car-lifts/5000tlx/

1720550705587.png
 
Last edited:

David Garton

Supporter
Hello David, I am planning on buying a quick jack for my SPF GT40 and I was wondering if you could tell me the make and size of quick jack you are using? I understand that there are a few sizes available. I am also particularly interested in where you have positioned them under the GT40 so as not to cause any damage to the bodywork or chassis? For example, do you use rubber blocks between the chassis and jack? Any info you can provide will be appreciated.
Thank you.
Robbie.
Robbie, my Quick Jack's 6000 and are longer and heavier duty then the 5000's and work great. I bought them on Black Friday sale for under $1500 free shipping. They come with two thickness blocks. I put them forward where the lower control arms meet at the frame and rears end up under the crossmember. Photos of model numbers.
 

Attachments

  • 20240709_220301.jpg
    20240709_220301.jpg
    367.6 KB · Views: 225
  • 20240709_220307.jpg
    20240709_220307.jpg
    385 KB · Views: 185
  • 20240709_220423.jpg
    20240709_220423.jpg
    854.4 KB · Views: 180
  • 20240709_220340.jpg
    20240709_220340.jpg
    707.7 KB · Views: 181
  • 20240709_220351.jpg
    20240709_220351.jpg
    476 KB · Views: 168
  • 20240709_220419.jpg
    20240709_220419.jpg
    353.3 KB · Views: 158
  • 20240709_220312.jpg
    20240709_220312.jpg
    330 KB · Views: 164
Robbie, my Quick Jack's 6000 and are longer and heavier duty then the 5000's and work great. I bought them on Black Friday sale for under $1500 free shipping. They come with two thickness blocks. I put them forward where the lower control arms meet at the frame and rears end up under the crossmember. Photos of model numbers.
Thank you for taking the time to reply with all this detail David, exactly the information I require. I am based in the UK so I will search for this model and size to see what price I can buy it here in the UK. Really appreciate your reply.
Robbie.
 
Personally I think the 6000 series QJs are way overkill for use with the 40 only, but I could see going with them if you have other larger vehicles that require them. I have the 5000 series and they’re perfect for the 40, plus they also lift my Nissan Frontier (4700 lbs).
 

David Garton

Supporter

Attachments

  • 20230921_053819.jpg
    20230921_053819.jpg
    188.9 KB · Views: 124
  • 20230921_053847.jpg
    20230921_053847.jpg
    143.2 KB · Views: 121
  • 20230921_053923(0).jpg
    20230921_053923(0).jpg
    188.6 KB · Views: 118
  • 20230921_053913.jpg
    20230921_053913.jpg
    370.7 KB · Views: 127
  • 20230921_053827.jpg
    20230921_053827.jpg
    384.1 KB · Views: 198

David Garton

Supporter
Ok back at it. Put the rear chassis pieces back on and test fitted the exhaust and the bundle of snakes from Gelscoe because of the Gurney heads were close to the upper crossmember and definitely going to interfere with the swaybar. So tubes tight and collectors on I slung them and made some clearance. No heat on the tubes just cold weight. Gained good clearance and the rear bracket under the trumpets now. I need to change the swaybar to over the exhaust type?? Has anyone had any luck making the under style work? Engine and Trans are mounted factory height including lower crossmember and lower bellhousing all bolted up . Thank in advance. Pulling bundle of snakes and sending out to Ceracoteinner and outer tubes.
 

Attachments

  • 20240918_000520.jpg
    20240918_000520.jpg
    583.3 KB · Views: 167
  • 20240918_000529.jpg
    20240918_000529.jpg
    353.8 KB · Views: 171
  • 20240918_000538.jpg
    20240918_000538.jpg
    371.6 KB · Views: 154
  • 20240918_000919.jpg
    20240918_000919.jpg
    482.4 KB · Views: 157
  • 20240918_000934.jpg
    20240918_000934.jpg
    533.2 KB · Views: 159
  • 20240921_024858.jpg
    20240921_024858.jpg
    274.3 KB · Views: 162
  • 20240921_034232.jpg
    20240921_034232.jpg
    454 KB · Views: 156
  • 20240921_034250.jpg
    20240921_034250.jpg
    283.7 KB · Views: 162
  • 20240921_092221.jpg
    20240921_092221.jpg
    478.1 KB · Views: 157
  • 20240921_092251.jpg
    20240921_092251.jpg
    454.4 KB · Views: 182
Last edited:

Darius Rudis

Supporter
>... I slung them and made some clearance. No heat on the tubes just cold weight.

How much clearance did you need?
I am in similar dilema (interference with Cross-Member)

1727103946280.png
 

David Garton

Supporter
>... I slung them and made some clearance. No heat on the tubes just cold weight.

How much clearance did you need?
I am in similar dilema (interference with Cross-Member)

View attachment 142411
Darius, As you can see from the pictures I had to leave header flanges at head slightly loose and then I wiggled the collectors on. Once the collectors were in place I strapped the collectors as to pull the same on all tubes and not just one. Tighten the flanges and lifted the collectors until I could bolt the bracket in place for the trumpets to rest on. After that I would say I gained 1 1/2 inches above the crossmember and trans mount. I was even able to bolt the sway bar in but it touched the bottom of the collectors. I will work on that fix next.
 

David Garton

Supporter
Had to put a slight bend in swaybar to go under the exhaust collectors. Turned out to fit great under collectors and just above the Trans mount castings.
 

Attachments

  • 20241020_101844.jpg
    20241020_101844.jpg
    347.4 KB · Views: 144
  • 20241020_100745.jpg
    20241020_100745.jpg
    227 KB · Views: 144
  • 20241020_100631.jpg
    20241020_100631.jpg
    236 KB · Views: 142
  • 20241020_100617.jpg
    20241020_100617.jpg
    283.5 KB · Views: 161

David Garton

Supporter
Finally got a day to get some work done. Fuel pump bracket threaded inserts installed. Detail work on Stewart Warner pumps and needed to wait for paint to dry so I decided to install starter and kill switch. Once I made battery cables and figured out starter signal wire, AC signal wire and routed harness down right side and acrossed to left side to the alternator. Then I was able to crank engine and get distributor and ignition wires on top dead center.Even had roundel numbers lit up . Next is turkey tray and carbs and linkage. Then the bundle of snakes i had ceramic coated in bronze.
 

Attachments

  • 20250222_094903.jpg
    20250222_094903.jpg
    152.6 KB · Views: 92
  • 20250222_110811.jpg
    20250222_110811.jpg
    451.7 KB · Views: 96
  • 20250222_191051.jpg
    20250222_191051.jpg
    308.9 KB · Views: 89
  • 20250222_163659.jpg
    20250222_163659.jpg
    145.7 KB · Views: 90
  • 20250222_221641.jpg
    20250222_221641.jpg
    300.4 KB · Views: 89
  • 20250121_091252.jpg
    20250121_091252.jpg
    307.2 KB · Views: 90
  • 20250222_123229.jpg
    20250222_123229.jpg
    337 KB · Views: 91
  • 20250222_221808.jpg
    20250222_221808.jpg
    570.6 KB · Views: 93
  • 20250124_055438.jpg
    20250124_055438.jpg
    824.6 KB · Views: 92
  • 20250116_055006.jpg
    20250116_055006.jpg
    350.2 KB · Views: 111

David Garton

Supporter
Fuel pumps detailed and mounted. Turkey tray , carburators and linkages all installed as well as small cap distributor installed at top dead center with ignition wires installed with firing order. Next is to make the special throttle cable bracket and then my ceramic coated in bronze bundle of snakes. Going to bend and flare my own steel fuel lines. Getting closer to breathing fire out of the headers.

thumbnail (66).jpgthumbnail (64).jpgthumbnail (71).jpgthumbnail (40).jpgthumbnail (39).jpgthumbnail (38).jpgthumbnail (37).jpg
 
Back
Top