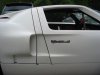
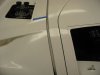
Headlights
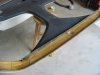
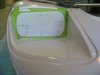
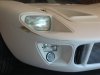
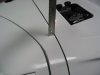
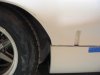
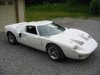
The opening for the headlights was cut, after making our usual pattern. The same pattern was used for both sides. The openings were cut small, then sanded to shape, with most of the sanding on the lower edge. As the picture shows, the lower edge started out around 3/8” but ended up less than a quarter inch from the lower edge when finished. Be careful of the top inside corner; it is tight.
We took a somewhat different approach for the headlight supports. Instead of fabricating an aluminum bracket, we opted for wood and fiberglass.
Our first experience working with fiberglass was in a somewhat unusual format. Several years ago we built a radio controlled model of New England lobster boat. The hull was fabricated from basswood bulkheads joined by stringers, then covered with a thin layer of basswood strips. The hull was sanded to its final shape. It was very light and did not seem very durable. But once it was covered with a single layer of fiberglass impregnated cloth it became remarkably rigid.
The same approach was followed in fabricating the supports for the GT head lights for several reasons. First, it is easier to cut a thin piece of plywood and sand it to the exact shape than with aluminum. Second, it can be glued with epoxy directly to the headlight opening, rather than tabbed to the inner fenders. Third, it is rigid and does not flex. Here is how we did it.
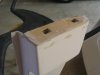
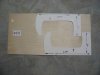
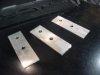
First a pattern was made. The left and right are slightly different in size, so two patterns were made.
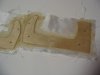
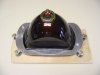
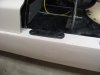
Second, we cut the supports out of 1/16” modeler’s plywood. (Midwest brand, birch plywood, 1/16” x 12 x 24). (Check you local Hobby Lobby or model railroad / airplane store). Eighth inch thick could just as easily be used and would impart a bit more strength. The plywood was carefully cut and sanded until it precisely fit the glass lenses and the openings which had been cut in the front clip. The holes to fit the aluminum frame that secures the headlight to the support bracket were then drilled.
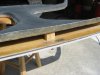
Third, the plywood was covered with fiberglass impregnated cloth, first one side, then the other Be sure to place a weight on the supports so they don’t warp while curing (make sure what ever is used does not stick) or tack it to a board. After they dried, the excess glass cloth was cut away. Some test fitting and a bit more sanding assured a perfect fit.
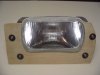
The screw assemblies, eight in all, were set up. We used stainless 10/32 x 2 inch bolts, three quarter inch washers on either side of the wood/fiberglass support tightened down with a nut. Than an appropriate spring and a brass knurled knob completed the assembly. Once the screw assemblies were secured to the support, the wood/fiberglass supports were glued in place with epoxy, running a nice bead around the inside of the head light opening. The support was carefully lined up with the opening in the clip. After holding it in place long enough for the five minute epoxy to cure, the head lights were installed.
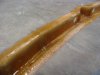
There is no need to glue or glass the outer edges of the wood/fiberglass support to the inner fenders. Indeed it is probably better not to, since any slight body flex will stress the bracket. Indeed, with the wood/fiberglass support secured to the headlight opening the alignment will remain true and not be subject to flexing of the front clip.
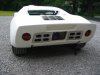
The driving lights are an inexpensive generic model available at most car parts stores. (We may replace it with a slightly larger, better quality style once we find a suitable model.) The marker lights are a Lucas, L-488, available from Finish Line. cobra, nardi, moto-lita, mini cooper, ferrari, shifter carts, parts and accessories from Finish Line. It is a dual filament, so will function both as a turn signal and a parking light. It is available in either amber or clear. Most GTs had amber, but some early cars had clear. We opted for clear to give a bit more vintage look.
The opening for the headlights was cut, after making our usual pattern. The same pattern was used for both sides. The openings were cut small, then sanded to shape, with most of the sanding on the lower edge. As the picture shows, the lower edge started out around 3/8” but ended up less than a quarter inch from the lower edge when finished. Be careful of the top inside corner; it is tight.
We took a somewhat different approach for the headlight supports. Instead of fabricating an aluminum bracket, we opted for wood and fiberglass.
Our first experience working with fiberglass was in a somewhat unusual format. Several years ago we built a radio controlled model of New England lobster boat. The hull was fabricated from basswood bulkheads joined by stringers, then covered with a thin layer of basswood strips. The hull was sanded to its final shape. It was very light and did not seem very durable. But once it was covered with a single layer of fiberglass impregnated cloth it became remarkably rigid.
The same approach was followed in fabricating the supports for the GT head lights for several reasons. First, it is easier to cut a thin piece of plywood and sand it to the exact shape than with aluminum. Second, it can be glued with epoxy directly to the headlight opening, rather than tabbed to the inner fenders. Third, it is rigid and does not flex. Here is how we did it.
First a pattern was made. The left and right are slightly different in size, so two patterns were made.
Second, we cut the supports out of 1/16” modeler’s plywood. (Midwest brand, birch plywood, 1/16” x 12 x 24). (Check you local Hobby Lobby or model railroad / airplane store). Eighth inch thick could just as easily be used and would impart a bit more strength. The plywood was carefully cut and sanded until it precisely fit the glass lenses and the openings which had been cut in the front clip. The holes to fit the aluminum frame that secures the headlight to the support bracket were then drilled.
Third, the plywood was covered with fiberglass impregnated cloth, first one side, then the other Be sure to place a weight on the supports so they don’t warp while curing (make sure what ever is used does not stick) or tack it to a board. After they dried, the excess glass cloth was cut away. Some test fitting and a bit more sanding assured a perfect fit.
The screw assemblies, eight in all, were set up. We used stainless 10/32 x 2 inch bolts, three quarter inch washers on either side of the wood/fiberglass support tightened down with a nut. Than an appropriate spring and a brass knurled knob completed the assembly. Once the screw assemblies were secured to the support, the wood/fiberglass supports were glued in place with epoxy, running a nice bead around the inside of the head light opening. The support was carefully lined up with the opening in the clip. After holding it in place long enough for the five minute epoxy to cure, the head lights were installed.
There is no need to glue or glass the outer edges of the wood/fiberglass support to the inner fenders. Indeed it is probably better not to, since any slight body flex will stress the bracket. Indeed, with the wood/fiberglass support secured to the headlight opening the alignment will remain true and not be subject to flexing of the front clip.
The driving lights are an inexpensive generic model available at most car parts stores. (We may replace it with a slightly larger, better quality style once we find a suitable model.) The marker lights are a Lucas, L-488, available from Finish Line. cobra, nardi, moto-lita, mini cooper, ferrari, shifter carts, parts and accessories from Finish Line. It is a dual filament, so will function both as a turn signal and a parking light. It is available in either amber or clear. Most GTs had amber, but some early cars had clear. We opted for clear to give a bit more vintage look.


") . You will certainly receive this payment. Top notch gents! Looks almost as good as mine...:shocked:...:laugh::laugh:
. You will certainly receive this payment. Top notch gents! Looks almost as good as mine...:shocked:...:laugh::laugh: