UK KVA "C" rebuild 2023

Hi all,
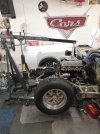
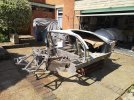
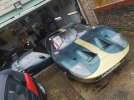
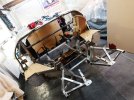
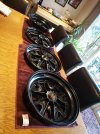
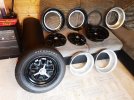
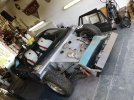
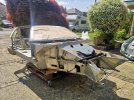
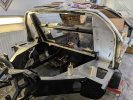
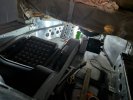
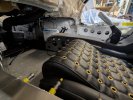
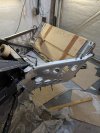
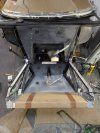
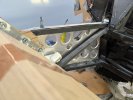
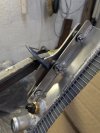
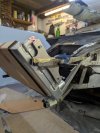
Just purchased what I believe to be a "c" chassis KVA, that has sat still for 28 years.
I will post some pics , and would appreciate any information on parts that are used and pointers as to what might benefit with upgrading.
My aim is to try and replicate a original looking car (lights/indicators/seats /interior) but I know its always going to be a replica.
Looking for a meet with fellow owners in the south of England so I can pick over some details of other peoples cars!
What are the differences between a 1988 KVA body and a original, as I was led to believe that the bodys came from a original GT40 mold, but have read elsewhere that they are incorrect.
Where are the front side repeaters placed originally if they had them?
Not looking to make SVA compliant as its already reg
IMG_20230406_092335.jpg
IMG_20230406_091439.jpg
IMG_20230401_100917.jpg
IMG_20230401_101658.jpg
IMG_20230401_095857.jpg
IMG_20230401_095900.jpg
IMG_20230401_100337.jpg
IMG_20230406_125329.jpg
IMG_20230401_100519.jpg
IMG_20230409_152815.jpg
istered!...so many questions!
TIA,
Ian.

IMG_20230406_091439.jpg
 

Brian Kissel

Staff member
Admin
Lifetime Supporter
Quite a find there Ian. Perhaps you should join the enthusiasts club over there. There are a lot of very knowledgeable people on that side of the pond.
Good luck with your quest.
Regards Brian
 

Mike Pass

Supporter
KVA is from Kenneth Vincent Attwell who was allowed by Ford to create a replica. He made several alterations to the original body shape which is why most replicas have the ridge line at the top rear of the side windows. The C type chassis is OK. The slight issue is that the chassis tapers in at the front so the wishbones are of unequal length. This means that on full lock the tyre can touch the inner wheel arch at the back.
The C type uses Ford Granada uprights at the front with fabricated tubular wishbones and coil over dampers. The rear uses trailing links with reversed lower wishbone and a fabricated upright with Ford Granada Mk3 hubs which are 5 bolt. The Halibrand style 15" wheels have a limited choice of tyres. I would change the concrete tyres you have for Avon cr6zz which are the best but not cheap!
The KVA body panels are good and like the GTD bodies.
You have a Renault gearbox which may be the 369 box or the UN1, There is usually a metal tag on one of the rear cover bolts with the model number stamped into it. The clutch is probably the Renault one. The box is attached to the engine with an adaptor plate.
The engine looks like a Rover V8 and probably has a 390cfm Holley carb with vacuum secondaries. The carb will have a List Number stamped into the choke tower on top of the carb so you can look up the specs and rebuild kits on the Holley list numbers info.
The seats look to be Corbeau which don't look very original.
There is a right hand rod gearchange set up.
I would suggest a good check of the brake lines and also the fuel lines which may have deteriorated. Also the brake pistons may be stuck due to corrosion. The brake calipers and seal kits are available from Burton Power as are the hub bearings.
You have a good base to start off.
First off follow JPs suggestion and join the GT40 Enthusiasts Club. There will be a group near you with monthly meetings vwhere you can meet up with other owners and get access to a lot of help and knowledge.
Post where you are based as this will help to suggest local help.
Cheers
Mike
 
Last edited:
Well 18 months on, and there was allot of 80s quality inside the car... The more I removed the more I needed to remove and remedy.
Engine and box is rebuilt, chassis has had bits cut out and new put in.
Panels remade, tanks modified, and everything overhauled it replaced.
Hoping I'm at the bottom of the bell curve of dismantling, even ended up moving the pedal box .
Hoping to finish with a quality looking and driving car .. In the next 12 months
 

Attachments

  • IMG_20230725_095148.jpg
    IMG_20230725_095148.jpg
    267.2 KB · Views: 143
  • IMG_20240508_111127.jpg
    IMG_20240508_111127.jpg
    858.6 KB · Views: 137
  • IMG_20230406_132131.jpg
    IMG_20230406_132131.jpg
    637.7 KB · Views: 130
  • IMG_20241103_201134.jpg
    IMG_20241103_201134.jpg
    533.4 KB · Views: 128
  • IMG_20241101_140456.jpg
    IMG_20241101_140456.jpg
    323.7 KB · Views: 130
  • IMG_20241104_120754.jpg
    IMG_20241104_120754.jpg
    652.1 KB · Views: 133
  • IMG_20230807_152106.jpg
    IMG_20230807_152106.jpg
    407.2 KB · Views: 136
  • IMG_20230409_152838.jpg
    IMG_20230409_152838.jpg
    662.4 KB · Views: 135
  • IMG_20240508_111136.jpg
    IMG_20240508_111136.jpg
    890.7 KB · Views: 135
  • IMG_20230409_152739.jpg
    IMG_20230409_152739.jpg
    520 KB · Views: 159
Well 18 months on, and there was allot of 80s quality inside the car... The more I removed the more I needed to remove and remedy.
Engine and box is rebuilt, chassis has had bits cut out and new put in.
Panels remade, tanks modified, and everything overhauled it replaced.
Hoping I'm at the bottom of the bell curve of dismantling, even ended up moving the pedal box .
Hoping to finish with a quality looking and driving car .. In the next 12 months
 
Well cold dark nights means progress in the garage, gone freestyle with the interior. When the temperature warms up I can paint some bits and start to reassemble it.
 

Attachments

  • PXL_20250103_193613925.jpg
    PXL_20250103_193613925.jpg
    398.2 KB · Views: 111
  • PXL_20250102_121534288.jpg
    PXL_20250102_121534288.jpg
    306 KB · Views: 112
  • PXL_20250101_220945623.jpg
    PXL_20250101_220945623.jpg
    406.1 KB · Views: 111
  • PXL_20241228_135728979.jpg
    PXL_20241228_135728979.jpg
    353.6 KB · Views: 131
Big job Ian, but it looks like you’ve come a long way. No way to get through a huge project like that without perseverance and commitment…kudos!
 
Bit the bullet and bought a purpose made radiator as the original brass one was going to cost more, be less efficient and heavier. That has lead to removal of the last few panels left attached, so panel number 76 and 77 made
 

Attachments

  • PXL_20250209_181849735.jpg
    PXL_20250209_181849735.jpg
    305.2 KB · Views: 79
  • PXL_20250209_181032540.jpg
    PXL_20250209_181032540.jpg
    317.3 KB · Views: 78
  • PXL_20250208_165739579.jpg
    PXL_20250208_165739579.jpg
    283.4 KB · Views: 76
  • PXL_20250208_090922296.jpg
    PXL_20250208_090922296.jpg
    210.9 KB · Views: 79
  • PXL_20250208_090932009.jpg
    PXL_20250208_090932009.jpg
    175.5 KB · Views: 79
Back
Top