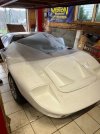
Well I’ve been lurking and asking questions for months so I figured I’d start a build log now that I’m starting to do some work on it. I picked up the RCR gt40 last year and have been collecting and ordering parts for it since while also working on other cars. Ordered a Dart stroker 363 with Borla 8 stack from Prestige and clutch package from Safir to mate it to a ZF-2 that was rebuilt by Ron McCall. I’ve built a few cars from the ground up (69 big block Vette and 71 big block Mustang Mach 1 along with tearing apart others) but already seeing so many differences in the 40 and its components! Hence all the questions. Nothing worse than buying parts that you end up not using. So it will be a slow casual build and I look forward to gathering as much information as I can from other members and hopefully it will help new members down the road.

You are using an out of date browser. It may not display this or other websites correctly.
You should upgrade or use an alternative browser.
You should upgrade or use an alternative browser.
Pat’s RCR 40 build in NY
- Thread starter Pmccooey
- Start date


Welcome Pat! Looks like you have the foundation of a great build. Update us often on progress as I find it makes me feel responsible to make time in the shop and get something done for my next update.
Just remember it’s like eating an elephant…just take daily bites and before you know it, it will be done!
Devin
Just remember it’s like eating an elephant…just take daily bites and before you know it, it will be done!
Devin
Randy Folsom
Supporter
Looking forward to seeing your project come to life.Well I’ve been lurking and asking questions for months so I figured I’d start a build log now that I’m starting to do some work on it. I picked up the RCR gt40 last year and have been collecting and ordering parts for it since while also working on other cars. Ordered a Dart stroker 363 with Borla 8 stack from Prestige and clutch package from Safir to mate it to a ZF-2 that was rebuilt by Ron McCall. I’ve built a few cars from the ground up (69 big block Vette and 71 big block Mustang Mach 1 along with tearing apart others) but already seeing so many differences in the 40 and its components! Hence all the questions. Nothing worse than buying parts that you end up not using. So it will be a slow casual build and I look forward to gathering as much information as I can from other members and hopefully it will help new members down the road.
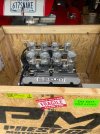
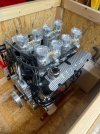
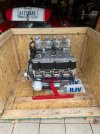
You must have been jumping up and down uncrating that bee-utiful motor!Engine and trans
David Garton
Supporter
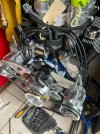
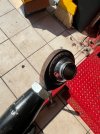
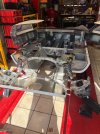
Good morning and looks like you have a great start to your build. I noticed the harmonic balancer seems to either have a spacer behind it or it's not secured all the way . If there is a spacer it will move all your belts and pulley's into the back of the cockpit so you might remove the spacer prior to making your pulley alignments as you will find out they need to be as far back as possible. Great start and keep us posted.
Good morning and looks like you have a great start to your build. I noticed the harmonic balancer seems to either have a spacer behind it or it's not secured all the way . If there is a spacer it will move all your belts and pulley's into the back of the cockpit so you might remove the spacer prior to making your pulley alignments as you will find out they need to be as far back as possible. Great start and keep us posted.
It’s a spacer behind the balancer but I assumed there was more room at the bottom with the cockpit slanting foward? Here is a pic of the mock up with accessories on. I need to change out the water pump plate and redo it.
Attachments
Darius Rudis
Supporter
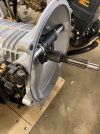
Depending on what you do for water pump...
Here is my scenario with water-pump pulley (will machine-off, versus buy, the pulley - just cause I can), and create more room.

Here is my scenario with water-pump pulley (will machine-off, versus buy, the pulley - just cause I can), and create more room.
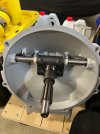
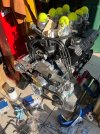
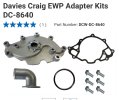
I am going with a remote electrical water pump and this backing plate so there will be no water pump pulley. I’m assuming others with a Prestige engine have this spacer also on their harmonic balancer. I’m assuming the harmonic balancer, AC and alt pulleys will clear?
Attachments
Hi Pat,
The Davies Craig Adaptor is the tidiest, low profile method of connecting an electric waterpump to a small block Ford. It makes more room everywhere for ancillaries such as alternator, a/c compressor and power steering pump.
With GT40 applications the "over the counter" mounting brackets designed for Mustang or Hot Rod applications will not work as supplied. Be prepared for modifications or making your own brackets.
Going with the remote water pump does simplify the belt paths for accessories. Make sure the pulleys are aligned true saves you from squealing or short lived belts (including belt driven waterpumps) .
Great parts from Davies Craig btw and no I'm not being paid to say so")
Cheers
Ian
The Davies Craig Adaptor is the tidiest, low profile method of connecting an electric waterpump to a small block Ford. It makes more room everywhere for ancillaries such as alternator, a/c compressor and power steering pump.
With GT40 applications the "over the counter" mounting brackets designed for Mustang or Hot Rod applications will not work as supplied. Be prepared for modifications or making your own brackets.
Going with the remote water pump does simplify the belt paths for accessories. Make sure the pulleys are aligned true saves you from squealing or short lived belts (including belt driven waterpumps) .
Great parts from Davies Craig btw and no I'm not being paid to say so
Cheers
Ian
Nice! Do you think that will give you enough room not to have a bulkhead bump out between the seats?Yes I went with the Davies plate. Much more room to work with.
I sure hope so. Ready to drop the engine in but trying to figure out what to do with the rear clam? Running out of storage space. Also wondering if I can put it in with the clam attached? Engine and trans together or install separately. Everything is new for me working in this car compared to all the other muscle cars.
Hi Pat, Devin,
Yes there is no need for the bulge in the firewall with the Davies Craig Waterpump Adaptor kit. I know this for a fact (can't show any pictures - yet!). Makes a very clean front of engine area.
Pat, It's easier in the long run to install the engine and transaxle as an assembly. This means you will have already verified no runout between the bellhousing/transaxle/engine. Anymore more than .001-.002 runout can cook your throwout bearing and make first and reverse nearly impossible to engage. So you'll have to pull it all out again... been there - done that.
The alignment of the rear clam is set independent of the drivetrain, get it right, set the pivots. Make sure you set the wheelbase to the chassis, not the wheel arch as the wheel arches can be different side to side in some cases buy not always.
Cheers
Ian
Thanks I figured it would be easier as an assembly. I checked the bellhousing during assembly and remember shooting for .005 and it was within those specs. I can’t remember the numbers but they might still be on the bellhousing. I’ve always shot for .005, can’t imagine going for .001. Now I’m undecided if I need to prep or paint any of the chasis before dropping the engine/trans in.
Hello Ian,Hi Pat, Devin,
Yes there is no need for the bulge in the firewall with the Davies Craig Waterpump Adaptor kit. I know this for a fact (can't show any pictures - yet!). Makes a very clean front of engine area.
Pat, It's easier in the long run to install the engine and transaxle as an assembly. This means you will have already verified no runout between the bellhousing/transaxle/engine. Anymore more than .001-.002 runout can cook your throwout bearing and make first and reverse nearly impossible to engage. So you'll have to pull it all out again... been there - done that.
The alignment of the rear clam is set independent of the drivetrain, get it right, set the pivots. Make sure you set the wheelbase to the chassis, not the wheel arch as the wheel arches can be different side to side in some cases buy not always.
Cheers
Ian
How much front-to-back angle can you have on the half-shafts? I have the same basic drive train as Pat but with a Kennedy Bellhousing. For my half-shafts to be nearly 90 degrees between the gearbox and wheel hub I would have a bulge into the cockpit with the engine set more forward. Its been a while since I've had time to work on my build and can't remember my exact wheelbase length. 66" if I remember correctly? So, how far back can I move the drive-train and not strain the half-shafts? This is will be a street GT40.
Thank you Sir!
Louis
Hi Louis,
It's advisable to keep driveshaft angularity to a minimum at ride height (fully loaded and aligned). However there are many variables. Rather than hijack the thread I will send you a pm.
Perhaps there is already a thread on the forum about this very topic?
Cheers
Ian
It's advisable to keep driveshaft angularity to a minimum at ride height (fully loaded and aligned). However there are many variables. Rather than hijack the thread I will send you a pm.
Perhaps there is already a thread on the forum about this very topic?
Cheers
Ian
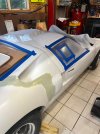
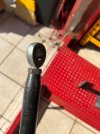
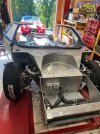
Well got some stuff moved around and am starting to tear into the car at last. Have the body pieces on horses and pulling pieces for powder coating. Looking at the helm joints on these pieces and some have surface rust and some look clean. Wondering if I how they are and if I should replace them all now with Teflon coated ones? Will check the forum for answers.
Attachments
Similar threads
- Replies
- 32
- Views
- 3K
- Replies
- 4
- Views
- 364
- Replies
- 15
- Views
- 2K