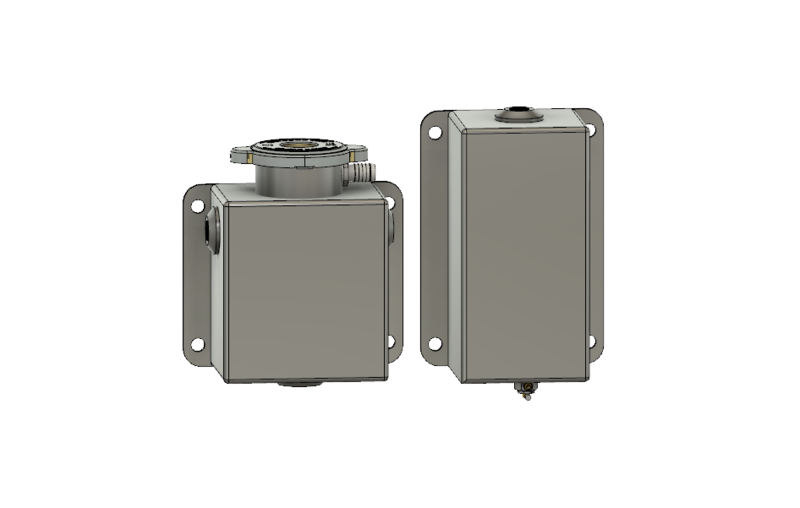
Coolant Tank

Ken Roberts

Supporter
The SLC radiator doesn't accommodate a surge tank directly due to the fact it wouldn't be installed at the highest point of the coolant system.

One of the radiator petcocks is removed and a fitting installed. The hose attached leads back to the coolant fill tank. You can either use the Dorman tank or a Moroso or similar tank.

If you want to use a overflow tank as well as the main coolant fill tank then you cannot use the Dorman tank.

The Dorman tank has no provisions for a overflow connection. Both upper hose barbs on that tank will be used by the radiator bleed line and the engine steam vent line.

A overflow connection can only be made at the pressure cap neck area after the cap seal.
 
Last edited:

Ken Roberts

Supporter
As you can see by almost everyone's build logs the coolant fill tank is almost always installed against the engine bulkhead wall. Most builders add standoffs to mount the tank away from the bulkhead. Two lines are attached near the top of tank. One is for the radiator bleed and the other is for the steam vent line at the engine. Most add a overflow tank if not using the Dorman tank. The coolant hose at the bottom of the tank connects (with a hose tee) to either the 3/4" heater hose circuit or the 1 1/2" coolant line returning from the radiator. It is not advised to connect the coolant fill tank to the 1 1/2" coolant tube feeding the radiator.
 
Last edited:
Definitely good info. That cleared up a lot for me. I see now the key is the barb is above the cap seal on the expansion tank as this was the point I wasn't understanding how it stayed pressurized with the overflow vent. I'm curious why nobody makes their own tanks at $100 a pop (other than to save time). Just want to make sure I'm not missing something. This type of neck maintains the desired cap seal correct? Canton Racing Weld-On Billet Aluminum Fill Necks 80-092 - Free Shipping on Orders Over $99 at Summit Racing

Since I have 4 tanks I need to make fuel cell, surge, expansion, overflow it seems the cheapest route may to have them all cut at once from a single sheet of aluminum and then bent...then I'll close them up and weld in bung. Thoughts?

I get one or two tank would not be cost effective to make probably. How thick of material would you say the moroso tank is?
 

Ken Roberts

Supporter
That is a great neck seal to work with. The tanks are about 1/8" thick. I had to weld in the second upper bung to my Moroso tank. I'm about to put a sight glass in mine now.
 
It's hard to keep track of all the good things you find. I bookmarked this and forgot about it. I think it's been shared here before too...good info.

Pirate4x4.Com - The largest off roading and 4x4 website in the world.

LS%20cooling%20system%20-%20surge%20tank_resize.jpg
 

Ken Roberts

Supporter
Great article indeed.

I need to switch my radiator steam port fitting (return to the fill tank) from the left "high" side over to the right "low" side. I have read that in a couple of different articles now. The high side can use just the "as provided" petcock.

The pirate4X4 article mentions it but then shows it in their "LS" diagram incorrectly.
 
Threw these together. They should do (hey I'm a finance guy, not a engineering guy). They're 1.1-1.2 quarts so similar in size to Moroso.


Ken Roberts

Supporter
That's perfect Scott. How about a group buy? I'd be in for a set for my next RCR car.

Just make sure that the overflow tank on the right has a tube that reaches down close to the bottom. (you can't just have a weld in bung at the top). Or you could just have a weld in bung near the bottom.

This company was used in the last group buy I believe. They will CNC cut and CNC bend the panels.

Custom Online CNC Machine Shop | Free CAD Software
 
Last edited:

Ken Roberts

Supporter
Here is a good source for aluminum coolant hose splicers, transition splicers and hose tees. I highly recommend using the aluminum over brass, nylon or iron fittings. The aluminum will have a long service life and without the worry of adding electrolysis.

The inside of the transition fittings are machined to provide a smooth transition from one size to the next to provide better flow.

You may need them in the following sizes:

1) 5/8" to 3/4" heater hose transition ( Vintage Air heater core return is 5/8" where as the LS water pump heater hose return fitting is 3/4")
2) 1" to 3/4" transition for the bottom of the stock Dorman coolant tank
3) 1 1/4" to 1 1/2" transition from the water pump outlet to the 1 1/2" stainless coolant tube down the left side of the car.
4) 3/4" by 3/4" by 3/4" heater hose tee to feed the bottom of the aftermarket coolant expansion tank.
5) 1 1/2" to 1 1/2" aluminum hose splicers for splicing in various shaped radiator hoses at the front if not custom welding the coolant tubing.

Stealth Conversions V8 Cooling System Parts
 
Last edited:
Scott

That reference article is incredible. Never thought nor understood the complexity/science in a cooling system. Now to plan out which parts optimize my system......aftermarket or factory. :thumbsup:
 
Change of plans for my tanks to cut costs. Instead of having sheet cut and bent which requires me to weld them together, I'm going to buy a foot of 4" square aluminum tube (.125) and a foot of 3.5 square tube (.125). The 4" will be cut in half for two 6" tall tanks - one oil catch can and one coolant expansion (1.5 qt each). The 3.5" will be cut down for the overflow. Then I just need to close the top and bottom and put in bungs/drains.

I think I'll do the same for a surge. 6" square tube by 1' (.1875)'. Will be about gallon and half. They won't be as pretty but will be a fraction of the cost and no machine shop needed. I think materials for the catch can, expansion, overflow, and surge will be @ $100 and just require the chop or band saw and welder.
 
I'm still thinking that through. If the back of the Apex opened so I could look at it, my life would be easy. I'm going to look into gauges and to avoid changes Evans coolant. We may try to make a rear removable clam but I'm not looking forward to it...and I would like to eventually drive this car. But If so something like these level indicators would suffice for me or one or two of the level sights.

McMaster-Carr

There shouldn't be a lot of pressure in these tanks so I'm thinking something cheaper could be found...seen them in the beer supply stores.
 
Last edited:
For a gauge, this is 5.9 inches tall and pretty cheap. But would not fit along side a cap on 4" square. Tank would need to be wider.

[ame="http://www.amazon.com/Fuel-Level-Indicator-150mm-Marine/dp/B00TEPM7G2/ref=sr_1_1?ie=UTF8&qid=1457659144&sr=8-1&keywords=KUS+S5+Fuel+Level+Indicator+Tank+150mm+12V%2F24V"]Level Indicator[/ame]
41t0pqDaSQL.jpg


Heat could be a concern on a fuel level sensor so might be better to stick to coolant related. You could instead put a low level indicator at any height on the tank side and have a light on dash.
 
Last edited:
Scott. Interesting find at MC. Didn't research it but if the level indicators can handle the pressure of say a Canton surge tank then I'm going to go that route in lieu of the Dorman which does seem to allow for the preferred LS engine plumbing. :thumbsup:
 

Ken Roberts

Supporter
The electronic level type of sensors are usually mounted at the top. There is no room for them unless you make a custom tank.

Here is what will be welded into the front of my Moroso tank soon. The goal is to be able to verify the level through the rear window before each cruise. It's a 1"npt weld bung and stainless sight glass. A bit on the large size and expensive but worth it for peace of mind.

 
Last edited:
Was thinking about something like this in the lower side of the expansion tank. Basically to just tell you if its below a certain level. This has the added benefit of letting you know while you're driving instead of an engine temp indicator.

Optimax sensor

3786023_sml.jpg


I was thinking the same thing about the rear window and a sight glass. I haven't seen a window on an apex yet...no idea if that will be feasible. I'm hoping so because I would much rather see it too. I don't like trusting a cheap sensor like that over time.
 
Last edited:
Gents
After much experimentation with space, I have abandoned the Dorman tank (its pretty space consuming). I now have a Canton 1.5 quart with a plumbing question.

I removed the top petcock from the radiator and will replace it with a barbed hose hookup. The Canton only has two threaded ports, one top side and one bottom (exclude the cap side vent tube). The bottom seems clear, a T connection with hoses to the low pressure heater and water pump return.

The issue is the radiator vent and engine steam vent.....do we connect both radiator vent and engine steam via tee to the top side threaded bung on the Canton?

Kens comment about switching from high side to low side has my head spinning on this one. :stunned:
 

Ken Roberts

Supporter
You can install a tee at the top fitting of the Canton if you don't want to weld in a second bung. Visually it would look a bit more cluttered though. That's all.

My bottom connection is simply a stainless steel 3/4" hose barb. A tee isn't necessary at the bottom fitting. It connects at the heater return circuit of the water pump (with a 3/4" tee).

The header tank at the left side of the radiator is considered the high side. The header tank at the right side is considered the low side. Ideally you want to use the right side header tank petcock as the air bleed connection according to the experts. Personally I don't think it really matters. Most builders use the left side as the air bleed return to the expansion tank. I haven't heard of any problems. The concern according to the experts is at high rpms there could be too much coolant flow returned to the expansion tank (at the top connection point). That is also the main reason why you should connect the bottom barbed fitting to the heater return circuit of the water pump. (not affected "as much" by coolant pressure at high rpms).

Here is a link to the stainless steel coolant hose barb and air bleed fittings that I use. Expensive but worth it for a long service life and less chance of electrolysis.

Performance Stainless Steel Heater Hose Fittings 1049 - Free Shipping on Orders Over $99 at Summit Racing

McMaster-Carr


The nylon 3/4" heater circuit tee

Dayco 80684 - Free Shipping on Orders Over $99 at Summit Racing

The nylon 3/4" to 5/8" heater circuit adapter.

Dayco 80662 - Free Shipping on Orders Over $99 at Summit Racing

Both of the nylon fittings are currently being replaced with fittings made out of aluminum by "Jags that Run".
 
Last edited:
Back
Top