And so it begins...the AP build.

Randy V

Moderator-Admin
Staff member
Admin
Lifetime Supporter
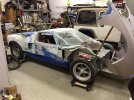
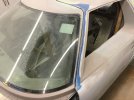
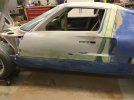
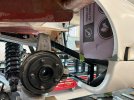
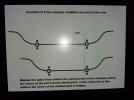
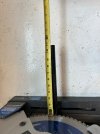
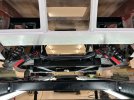
Not at all sure of what you have going on there. The spider on mine sat flush on the alloy cowl in the front and spaced up 1/8” on the rear feet to the fiberglass sills - then the front and rear clips should be fitted to the spider. The doors are to sit flush at the roof. These are the best shots I have on this iPad..
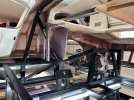
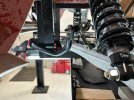
The spider gets mounted first..
 

Attachments

  • IMG_5464.jpeg
    IMG_5464.jpeg
    699.8 KB · Views: 154
  • IMG_5338.jpeg
    IMG_5338.jpeg
    543.7 KB · Views: 145
  • IMG_5334.jpeg
    IMG_5334.jpeg
    522.2 KB · Views: 122
Could you measure the height of the spider lip in the corners by the doors? It looks like yours in Taller than mine in the corners. I'm thinking I may need to split the lip, raise it up, and refiberglass it.
 

Randy V

Moderator-Admin
Staff member
Admin
Lifetime Supporter
Sorry Joe, my GT is long ago sold… There are many other RCR40 builders here..
 
I noticed that the shape and height of the lower corners of an RCR spider are wider that what is on my AP spider.
 
I have a feeling I’ll be splitting the front lip on my spider to make it wider at the corners where it meets the door and clam, but before that, the clam hinge needs to be finalized.
Step one: trim for clearance at the new rad support frame.
IMG_0278.jpeg
 
Next step is to get the spider mounted to the frame as I work my way forward. I wasn’t happy with the placement of the original bolts better limited adjustability for the clam seam. The riv nuts in the frame will have to be removed and welded shut so I can place the new spider bolts exactly where I want them. The lower feet of the spider were fortified with thickened epoxy that also filled the original holes in the fiberglass.
IMG_0377.jpeg
IMG_0378.jpeg
 
Deer season brings garage projects to a halt for a couple of months each fall. Been chipping away at getting the rockers squared away so that front and rear clam latches can be mocked up and installed. I started by drilling out the original rivnuts installed at AP and filled holes so that I can but the B-piller exactly where I want it on the frame. Filled the tops of the rockers with thickened epoxy in prep for redrilling pin holes.
Also, been emailing Jason at Prestige getting a quote put together for a 450 horse stacked 347. I'm on the fence as to if I will place my order by the end of the year, since it will probably be 2 years before the car is close to being on the road. I might just keep plugging away at all of the body and chassis work, but having the motor here would be nice.
IMG_0520.jpeg
IMG_0521.jpeg
IMG_0521.jpeg
IMG_0522.jpeg
IMG_0523.jpeg
IMG_0589.jpeg
IMG_0593.jpeg
IMG_0594.jpeg
IMG_0603.jpeg
IMG_0602.jpeg
 
IMG_0610.jpeg
IMG_0614.jpeg
IMG_0620.jpeg
IMG_0622.jpeg
IMG_0621.jpeg
IMG_0624.jpeg
IMG_0623.jpeg
On to getting the clam latch housings and latches installed. Started with getting the latch mocked up and the lower tab mounted to the rocker top. Then got everything taped off with duct tape in preparation for applying some thickened epoxy. The upper pins are next on the list after I get some short strand filler work done on the lower latch housings.
 
Fabricating close-out panels for the front corners of the rear clam are going to be challenging. The plan is to make the panels out of 1/2” foam sandwiched between epoxy and 1708 cloth. The front of the wheel tub needs to be closed out and triangulated with the close-outs as well.
IMG_0641.jpeg
IMG_0644.jpeg
IMG_0645.jpeg
IMG_0647.jpeg
IMG_0648.jpeg
 
Last edited:
Website is unchanged, except for the new address. I had heard that they were going to make some revisions to the chassis, but not sure. Chris Ardern is still easily contacted when I have questions.
 
Man, it’s been a while. My hopes of having bodywork done and the car in primer by the end of summer went out the door a long time ago. However, the bugs are worked out of the fastback and it is ready for paint, and the new gauge package is now in the 69.
I started working on getting the clam latches installed, since then will be needed before bodywork starts. They are larger that what AP usually uses, so I had to make new cut outs and figure out how the latches will be installed.
BTW...bodyworking the inside of an area that will never be seen may be the definition of OCD.
View attachment 141982View attachment 141983View attachment 141984View attachment 141985View attachment 141986View attachment 141987View attachment 141987View attachment 141988View attachment 141989View attachment 141990
Hi Joe what latches did you use?
 
Next step is finalizing fitment in foam. I haven’t decided if I am going to cover the 1/2” foam, or use 1/4” plywood instead. Either way, I’m planning on waiting until spring for warmer temps to lay the fiberglass and resin.
After talking to Chris, I started on the rear sway bar. I’m waiting on some urethane bushings and frame mounts similar to what is in the front, since the weird Corvette C5 mounts won’t work well with my frame. After removing a section of bar, I need to bevel the heck out of the ends and proceed to welding.
 

Attachments

  • IMG_0673.jpeg
    IMG_0673.jpeg
    828.1 KB · Views: 70
  • IMG_0671.jpeg
    IMG_0671.jpeg
    815.5 KB · Views: 70
  • IMG_20241217_092124029.jpeg
    IMG_20241217_092124029.jpeg
    1.1 MB · Views: 70
  • IMG_0676.jpeg
    IMG_0676.jpeg
    547.6 KB · Views: 69
  • IMG_0682.jpeg
    IMG_0682.jpeg
    508.3 KB · Views: 71
  • IMG_0680.jpeg
    IMG_0680.jpeg
    677.2 KB · Views: 69
  • IMG_0683.jpeg
    IMG_0683.jpeg
    770.6 KB · Views: 74
IMG_0701.jpeg
IMG_0700.jpeg
I’m still scratching my head on this one. When the front of the area behind the front wheel is held flush with the top corner of the rocker, the rears do this. Any thoughts on how to attack this before I break out the body saw?
 
IMG_0752.jpeg
IMG_0754.jpeg
IMG_0751.jpeg
IMG_0753.jpeg
IMG_0762.jpeg
IMG_0764.jpeg
IMG_0758.jpeg
IMG_0757.jpeg
IMG_0760.jpeg
IMG_0761.jpeg
This thing is an enigma wrapped in a riddle. Working on installing new locating pins on the front clam. With both sides having the rocker corner and lower clam wheel well nearly even, and the spider roughed in, there is less than 3/16” variance between the sides when measuring the door opening. The top front corners of the doors aren’t even side to side , nor is the clam.
The front corners of the spider aren’t coriander will need to be split and widened to make them taller so the spider meets the door and clam. Top of front clam seems to be wrapped pretty good too.
 
Seeing this and seeing Jerry's last video makes me glad I am not at this stage yet. I know those of use who are building are doing so because we enjoy the challenges and also like knowing it is truely ours.

There is also something about just buying it like most Superformance guys lol.

Everything is looking good as you progress though!
 
I prefer to pull into cars and coffee in my garage built, frame off, track and street ‘69 Firebird or ‘66 Fastback, rather than my ‘13 Boss 302 or ‘17 350R. Anybody can buy one of those. People are gonna literally crap their pants when I pull into cars and coffee with my straight piped GT40.
There is a solution to every problem.
 
Back
Top