Need cooling help please

Finally back at it for a little while. Fitting up these pipes in a tight space with the shifter cable and sensors wires was a serious frustrating pain. The sharp metal edges of the bulkhead panel did a number on my hands and arms (tore the skin off the middle joint of my dominate hand bird flipping finger).

The metal section was purchased from Hillbank and is supplied by SPF.

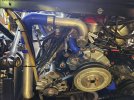
Here is what I have so far:
PXL_20241123_193818195.jpg


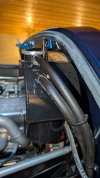
This picture is 90 degrees clockwise :
PXL_20241124_003259910.jpg


I used some u shapes auto trim to protect the hoses/pipe passing through the bulkhead.

I couldn't use the gates shrink clamps on some of the connections as they were too snug to get into place.

I wasted too much time trying to use silicone 5/8" 90 degrees hoses to the heater connections (one in the rear tunnel exit and one behind the thermostat housing). I ended up buying the proper 90 degrees 3/4" one end and 5/8" other end sections.

I have quite a few new leftover bits I will make available when this is all done.

I still need to fill the system and check for leaks ... maybe in a few days when I can bend my finger!
 
Mike, may be you should direct the top water pipe on the othe side of the car. Please look at the photo of mine
 

Attachments

  • 20240820_155831.jpg
    20240820_155831.jpg
    542.9 KB · Views: 77

David Garton

Supporter
Mike you've come a long way from your first post on this and I'm glad to say you have went about it the best way with no short cuts and you know your car a lot better now. Here's to many miles of no coolant leaks for you and your bird flipping finger.
 
Mike, I foreget, before to put water in the circuit, you may put compress air only, the maximum pressure that the rated plug could accept. Then you "listen" about the leaks if there is any, in a quite garage you will hear it.
After you put the water and the chances to get a leak will be very low.
 
PXL_20241206_234824371.jpg


So I connected the rest of the hoses and started a leak check which failed miserably. The gauge won't show any vacuum pull at all.

I see this second (lower hose) coming out of the reservoir and followed it through the tunnel to the front left of the radiator, I think. I can't see where it terminates. What is this line for?

I think my problem could be due to the gates shrink wraps. Maybe not shrink enough.

I am now looking for easy methods of leak detection. Any recommendations?
 

Attachments

  • PXL_20241206_234824371.jpg
    PXL_20241206_234824371.jpg
    143.9 KB · Views: 36
Radiator cap has a one way valve that will suck water from the overflow if there is any vacuum in the system. Might try 15 psi of air instead. You can use the soapy water in the spray bottle if you can't easily find the leak with your ear and hand.
 
Hey Brian,

The leak tester I am using replaces the radiator cap. It can also vacuum fill the system...Airlift.

I guess I can try to find a way to pressurize the system as you suggest. Not sure I have the bits to do that before I leave...
 
Last edited:
I thought that might not be a regular radiator cap.

You can replace the radiator cap, disconnect the overflow and blow air in there with a compressed air nozzle. That's how I do it. The radiator cap will vent before you blow anything up if you go in little bits, pulling off between to see if it's venting back.

Then I just use the squeeze the hose test for pressure.

I think it'll be near impossible to find a leak with vacuum, but fairly easy with pressure.
 
If you are using a vacuum fill system, you certainly can achieve a vacuum with a properly sealed system. That is how they work. You pull a vacuum, let it sit to ensure no leaks, then release the vacuum and the coolant is pulled in. I highly doubt you will ever pressurize the system as you describe and know if it is leaking. The lower hose is the bleed hose that goes to the radiator isn't it? You also have to plug the radiator overflow hose outlet at the nipple as I am guessing you are just sucking air past that as the vacuum system is not sealing around that opening. Not sure what you mean by shrink wraps. I would put clamps in each fitting end.
 
So, to clarify in my head, the reservoir top hose is pressure relief open when the cap pressure is high, the one about 1" down from that is a bleed return to the radiator, and the lowest is to the engine. The only open hose is the pressure relief line.

Brian, you refer to overflow line...is that the pressure relief line I am referring to (just under the cap)? Or is it the one about 1"down that Lee is saying is a radiator bleed line?

Lee, I have blocked the pressure relief line and tried to pull vacuum (in an effort to fill the system)...to no avail. That is how I know I have a leak.

The shrink wraps I am referring to are Gates Power Grip shrink bands used in lieu of clamps in some places.

Thanks for helping to educate me.
 

David Garton

Supporter
Mike, what type of adapter are you using on your airlift to where the cap is? Is it a cone that you twist and make it swell up to fit the hole below the cap? If it just twist on the cap and seals the top surface of resivor then you are more then likely pulling vacuum through the top hose that should just spill on to the ground and not another resivor because that is the resivor. There should be a tapered cone that would go below the top surface into the can below the top hose and then you are pulling vacuum on entire system. Hope this helps.
 
David, I used the normal Airlift one after blocking the other end of the relief hose, and then I used the cone one to no avail. I definitely have a leak and need to isolate it...which is today's challenge. I am trying to think of a way to adapt my homemade brake line pressure system to the cooling system to see if I can solve this...
 

Ian Anderson

Lifetime Supporter
Block the overflow pipe. Pressure relief pipe

Buy a pack of balloons
Blow one up and stretch the balloon neck over where the radiator cap sits.

Sit back and see if the balloon goes down. Yes and you have a leak….no and you are good to fill

Thanks to Chuck and Ryan for posting this method on their aircraft build for the fuel system

Ian
 
Hi all, I read all the way through this beating of a job. When I read the parts where Mike was getting frustrated, I found I was getting frustrated! I am very impressed by all the help Mike received by the deep knowledge pool of all on this forum. A job well done, Mike, I will be looking forward to any posts of the 40 actually running again and see if the original temp problem is fixed. D.
 
I couldn't agree more Dave! I always feel that I have lots of help on this forum. I am learning a great deal and appreciate all of the input!

At some point this project will be over and the car will be made beautiful again. I will gladly post then. But first, rotator cuff surgery! woot
 
Back
Top