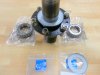
I thought I would share replacing the rear wheel bearings on my 40. I replaced one of the front wheel bearings some time ago but I didn't remember it being that hard but I can't say that for the rear. For most people they're going to have someone do it for them but being a glutton for punishment and wanting to share my pain I'm posting my experience.
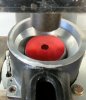
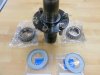
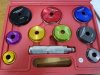
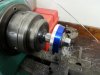
I was looking for some stock (steel or aluminum) to use to push out the old then push in the new inner and outer bearing races when the guy at the steel store told me he used a kit from Harbor Frieght and that he unexpectedly used it quite a bit. I have a real love hate with the place but since it didn't run on electricity I gave it a try and it worked out great.
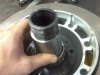
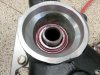
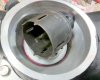
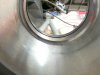
First off pushing out the inner race. As you can see from the picture there is almost nothing showing of the inner race from it's back side. In fact there's just a little more that .5 mm showing. So I turned down the OD of the 72mm tool to 67.1mm. Then I made a step at 65.9mm (.6mm per side). I then used the the supplied handle (see picture of the kit) to hammer out the race.
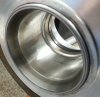
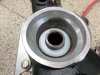
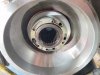
There was lots showing of the back side of the outer race the trick was getting something larger than the hole in back of the race to push it out. I had to cut a flat spot on each side of the 76mm tool so I could slip it through the bearing then turn it 90° seating it to the back of the race. Again I used the handle from the kit and a hammer to remove it. It turned out the 81mm tool was a perfect fit to hammer the new race into place.
Now putting in a new inner race. I ended up turning down the outside of the 76mm tool to install the inner race. I tried using a long bolt to suck the inner race into place but it went in sideways every time so I ended up pulling the upright out of the car and pushing it in with the press. Had I known I was going to remove the upright I would have used the press instead of a hammer for everything.
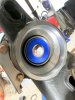
Picture 13 is the start of the reassembly. The first thing the goes on is a spacer that has a chamfer on one side. It's important the chamfer side goes down against the the pin hat. Removing the outer bearing can be very difficult without damaging the seal so I ground two spots on the spacer giving me a place to pry if needed later. Otherwise you have to use a knife or pry against the seal, not a good idea if you plan to reuse it. Next is the larger of the two seals with the rim facing the bearing, then the outer bearing. Slid the whole thing back into the upright putting on the inner bearing, seal, preload nut, and preload nut retaining ring (or whatever they call that POS). And last but not least the two TINY allen head screws which as soon as I figure out the bearing preload will be loctited in place.
One of the pictures shows just how little material there is to push on the back side of the inner race. A bit of poor planning on the part of SPF. The wheel bearings of the SPF GT-40 are one thing they should have updated to a newer technology.
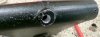
If you look at the lower shaft of the of the upright you'll see where they either put the setscrews that keep the shaft in the correct oreantation or the flat spots in the wrong place. It was easy just to add some new flat spots. One other thing there is a boss at the bottom of the upright which IMHO needed a hole to let out any water that collected in the bottom. That seemed better than letting it sit in the upright rusting the shaft.
I know way too much information, that was my opinion also. Otherwise it was a piece of cake. I'm leaving the bearing preload mess for another thread.
I was looking for some stock (steel or aluminum) to use to push out the old then push in the new inner and outer bearing races when the guy at the steel store told me he used a kit from Harbor Frieght and that he unexpectedly used it quite a bit. I have a real love hate with the place but since it didn't run on electricity I gave it a try and it worked out great.
First off pushing out the inner race. As you can see from the picture there is almost nothing showing of the inner race from it's back side. In fact there's just a little more that .5 mm showing. So I turned down the OD of the 72mm tool to 67.1mm. Then I made a step at 65.9mm (.6mm per side). I then used the the supplied handle (see picture of the kit) to hammer out the race.
There was lots showing of the back side of the outer race the trick was getting something larger than the hole in back of the race to push it out. I had to cut a flat spot on each side of the 76mm tool so I could slip it through the bearing then turn it 90° seating it to the back of the race. Again I used the handle from the kit and a hammer to remove it. It turned out the 81mm tool was a perfect fit to hammer the new race into place.
Now putting in a new inner race. I ended up turning down the outside of the 76mm tool to install the inner race. I tried using a long bolt to suck the inner race into place but it went in sideways every time so I ended up pulling the upright out of the car and pushing it in with the press. Had I known I was going to remove the upright I would have used the press instead of a hammer for everything.
Picture 13 is the start of the reassembly. The first thing the goes on is a spacer that has a chamfer on one side. It's important the chamfer side goes down against the the pin hat. Removing the outer bearing can be very difficult without damaging the seal so I ground two spots on the spacer giving me a place to pry if needed later. Otherwise you have to use a knife or pry against the seal, not a good idea if you plan to reuse it. Next is the larger of the two seals with the rim facing the bearing, then the outer bearing. Slid the whole thing back into the upright putting on the inner bearing, seal, preload nut, and preload nut retaining ring (or whatever they call that POS). And last but not least the two TINY allen head screws which as soon as I figure out the bearing preload will be loctited in place.
One of the pictures shows just how little material there is to push on the back side of the inner race. A bit of poor planning on the part of SPF. The wheel bearings of the SPF GT-40 are one thing they should have updated to a newer technology.
If you look at the lower shaft of the of the upright you'll see where they either put the setscrews that keep the shaft in the correct oreantation or the flat spots in the wrong place. It was easy just to add some new flat spots. One other thing there is a boss at the bottom of the upright which IMHO needed a hole to let out any water that collected in the bottom. That seemed better than letting it sit in the upright rusting the shaft.
I know way too much information, that was my opinion also. Otherwise it was a piece of cake. I'm leaving the bearing preload mess for another thread.
Attachments
-
 20160810_153203.jpg373.4 KB · Views: 408
 -
 20160810_183928-002.jpg332.6 KB · Views: 388
 -
 20160810_184605-001.jpg269.8 KB · Views: 422
 -
 20160811_093157.jpg424 KB · Views: 379
 -
 20160811_100059.jpg304.5 KB · Views: 426
 -
 20160811_100012-001.jpg334.9 KB · Views: 364
 -
 20160811_172516-001.jpg321.3 KB · Views: 422
 -
 20160811_183028-1.jpg221.3 KB · Views: 402
 -
 20160811_183028-002.jpg142.7 KB · Views: 407
 -
 20160811_181544.jpg207.6 KB · Views: 429
 -
 20160811_183043.jpg279.9 KB · Views: 403
 -
 20160811_183100.jpg219.8 KB · Views: 365
 -
 20160811_184124.jpg258.6 KB · Views: 380
 -
 20160811_184945.jpg336.7 KB · Views: 399
 -
 20160811_185000.jpg346.8 KB · Views: 380
 -
 20160811_185039.jpg309.8 KB · Views: 402
 -
 20160811_185132-001.jpg286.6 KB · Views: 384
 -
 20160908_135346.jpg285.6 KB · Views: 394
 -
 20160908_140037-003.jpg210.5 KB · Views: 338
 -
 20160908_135438.jpg319.5 KB · Views: 383
 -
 20160908_135854.jpg173.9 KB · Views: 405
 -
 20160908_135918.jpg178.5 KB · Views: 344
 -
 20160908_140135-001.jpg230 KB · Views: 355
 -
 20160908_135937.jpg179.7 KB · Views: 359
 -
 20160811_093248.jpg312.2 KB · Views: 344
 -
 20160908_135629.jpg156.6 KB · Views: 361
 -
 20160810_161648.jpg272.7 KB · Views: 398
 -
 20160811_164514-001.jpg157.8 KB · Views: 390
 -
 20160811_173700-001.jpg214.4 KB · Views: 331
 -
 20160811_182347-001.jpg160.8 KB · Views: 343
 -
 20160810_153100-1.jpg194.3 KB · Views: 357
 -
 20160809_130243(0).jpg401.9 KB · Views: 362
 -
 20160809_130005.jpg268.1 KB · Views: 358
 -
 20160809_130018.jpg205.1 KB · Views: 396
Last edited: