
- Forums
- GT40 Replica Manufacturers' Corner
- RCR Forum - RCR40/SLC/917/Superlite Aero
- The SLC Clubhouse
You are using an out of date browser. It may not display this or other websites correctly.
You should upgrade or use an alternative browser.
You should upgrade or use an alternative browser.
SLC 24 Howard Jones
- Thread starter Howard Jones
- Start date

Howard Jones
Supporter
I really don't think it's a real concern. It would not hurt to make up some 1/4 inch thick rubber washers and slide them under the fasener's steel washers just to give it a little room to adsorb vibration.
Use Nilock nuts and it should be fine.
Use Nilock nuts and it should be fine.
Last edited:
Apparently the coefficient of thermal expansion for 6XXX and 7XXX alloys is around .000025 (or so) per degree Celsius. Thus a fuel tank that is 2 meters long will grow about 5 cm if heated 100 degrees C above ambient.
Our tanks will likely never see a delta temp change of more than 50 c, and are less than 2 meters long, so the max change would realistically be less than 2.5 cm. At normal ambient, that means it could grow by 1.25 cm and shrink by 1.25 cm at the extremes. Thus, one could rigidly mount one end and engineer the other end to accommodate a swing of slightly less than 1.25 cm in each direction.
1.25 cm is just under a half inch (finally we get to good ole 'Merican numbers here), so mounting the end that moves centered in a half-inch slot would allow the tank to move with no stresses. Using foam, HPDM or similar material would go a long way towards stopping rattles, I expect.
So, that's what I'm going to do.
-Will
PS: I haven't stayed in a Holiday Inn Express for some time now, so if anyone wants to correct my math, or analysis, please do!
Will,
If I calculated correctly the delta L should be in the order of 0.5cm per delta T of 100 degrees. This does not take into consideration the width and thickness of the aluminum which should further decrease the delta L. Also, I'm not certain if the fuel itself might contribute to Delta L and perhaps even act as a heat sink. I too only stayed recently at a Holiday Inn.
If I calculated correctly the delta L should be in the order of 0.5cm per delta T of 100 degrees. This does not take into consideration the width and thickness of the aluminum which should further decrease the delta L. Also, I'm not certain if the fuel itself might contribute to Delta L and perhaps even act as a heat sink. I too only stayed recently at a Holiday Inn.
")
Oh.
Yeah, it should have been mm, not cm.
So, I'm off one lousy decimal point. :embarassed:
Seriously, thanks for the corrections- that's one of the benefits of having so many bright people on the site. That means that, worst case, the growth is much less than what I originally calculated.
I also agree that the tank isn't likely to actually see such a wide variance in delta T in practice, and that the fuel itself is likely to add some heat sinking, in addition to the rest of the structure of the tank. And of course the tank isn't 2 meters long, either. I was just trying to calculate what I thought might be the worst case in theory.
So it would seem that in practice, accounting for actual length, construction details, a more realistic assumption about delta T, the change is still pretty small- maybe not enough to worry about, as Jack and others originally thought.
-Will
Will,
If I calculated correctly the delta L should be in the order of 0.5cm per delta T of 100 degrees. This does not take into consideration the width and thickness of the aluminum which should further decrease the delta L. Also, I'm not certain if the fuel itself might contribute to Delta L and perhaps even act as a heat sink. I too only stayed recently at a Holiday Inn.
Don't forget that it is attached to an aluminum chasis that should be about the same temperature. The chasis should grow about as much as the tank.
Howard Jones
Supporter
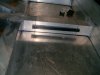
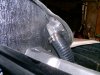
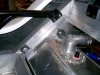
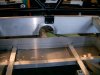
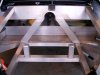
So anyway I don't know exactly how much the fuel tank will grow but here's how I am mounting it. The first one is a shot of the two bolts that are through the chassis under the tank behind the driver. If you just run bolt through the chassis tubing there isn't anyway to hold the head of the bolt. Here's how I do it. Now the bolts can't turn and all is necessary to remove the tank is to take off the nuts an pull it out.
I think that spending a little time figuring out how to take the car apart later really is worth the effort. This is an example.
The rubber squares will provide a little vibration absorbtion and I think it is enough to prevent the tabs from cracking. The tank can move around a little and that's what I was going for.
Attachments
Craig Gillingham
Banned because I can't follow the forum rules.
good work howard.
Do you plan to rubber mount the engine or solid?
Do you plan to rubber mount the engine or solid?
Howard Jones
Supporter
Solid engine/gearbox mounts.
Howard Jones
Supporter
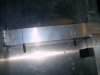
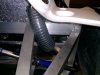
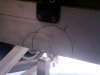
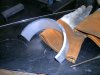
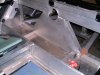
So here's how the fuel fill works. Out of the way, and in a good protected place. If you copy this, use a smaller diameter hose. 1 1/2" would be fine. This is 2 1/4 and is pretty hard to bend. I had to soak it in very hot water to get it to bend this much. The smaller diameter hoses are cheaper by the foot also.
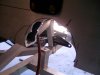
I also include a last mount picture. This one is the passenger side of the tank.
I also include a last mount picture. This one is the passenger side of the tank.
Attachments

Howard Jones
Supporter
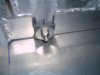
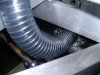
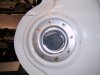
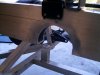
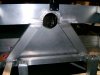
Started to do something about the water-pump pulley clearance issue. I couldn't just leave it because I would not been able to change a belt if I had to. Not to mention that it was just too close for comfort.
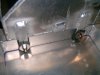
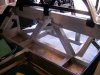
I found a big 6061 pipe that was 1/4 wall and 6 inch OD and I cut out a slice 2 inches wide. Then I opened up the big chassis cross tubing. It too is 1/4 wall. After I welded it in I called a buddy of mine and had him finish the welding of the diagonal pieces. The angle I had to work in was just beyond my skill level. It looks like a lot of room and good access but once I began I found I just couldn't keep my hand steady so I had my buddy do it for me.
The idea is to stiffen up the center section of chassis where the material was removed with the diagonal tubing I added and then box it all in with 1/8" thick 6061 plate. This will not only seal the engine room from the fuel tank compartment but add some more stiffness.
You can see that I have finished making the center plate and I'll post some more pictures as I complete the two side plates and rivet them all in place.
Attachments
-
 HPIM0938.jpg156.7 KB · Views: 452
 -
 HPIM0939.jpg118.8 KB · Views: 450
 -
 HPIM0940.jpg146.6 KB · Views: 456
 -
 HPIM0941.jpg153.8 KB · Views: 437
 -
 HPIM0943.jpg184.9 KB · Views: 438
 -
 HPIM0946.jpg147.1 KB · Views: 462
 -
 HPIM0947.jpg159.6 KB · Views: 480
 -
 HPIM0948.jpg138.7 KB · Views: 460
 -
 HPIM0950.jpg169.7 KB · Views: 459
 -
 HPIM0951.jpg153.3 KB · Views: 511
 -
 HPIM0952.jpg161.2 KB · Views: 464
 -
 HPIM0953.jpg137.8 KB · Views: 547
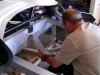
From what little welding we've done on the GT40 chassis I can tell you that it took a HECKUVA lot of current (heat) to weld that sucker and get good penetration.
Welding stooped over like that can't be fun either. Of course it would beat laying flat on your back and welding overhead (which I have a really tough time doing)..
Welding stooped over like that can't be fun either. Of course it would beat laying flat on your back and welding overhead (which I have a really tough time doing)..
Howard Jones
Supporter
I have a new Lincond 225 tig machine. Very nice machine. I think I am about even with what it cost me and what I would have spent on getting things welded up for me if I had to pay someone.
The real benifit is being able to just try something without any labor cost. Material as a rule is pretty cheap and a lot of stuff like this job can be had for nearly nothing. I bought the alum from a metal outfit locally. They have a cuttoff barrel and everything is sold by the pound. By the time I am done maybe a hundred bucks including the gas and filler rod.
Not to mention, I like the hobby.
By the way we were at about 160 - nearly 200 amps.
Similar threads
- Replies
- 12
- Views
- 875