Dave Forster
Supporter
My radiator came with grommets between the radiator brackets and the nose sidewalls, but despite the rubber, the radiator was extremely firm - it was not possible to wiggle it in the mounts.
I'm learning as I go along, but this seemed to defeat the purpose of isolation mounting, especially compared with some other cars, where the radiator could be "wiggled" by hand.
To get a little more wiggle, I did this:
- Remove the radiator and crossbars
- Drill out the holes in the nose sidewalls to 17/32" (the diameter will depend on the size of inner hose chosen)
- Drill out the holes in the radiator brackets to 9/16" (a loose fit)
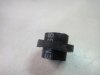
- Cut a 5/16" fuel hose into 8 lengths of 0.6" each
- Cut a 1/2" heater hose into 8 lengths of 0.2" each (making rings)
- Slip the heater hose rings over the fuel hose lengths
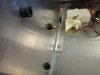
- Press the fuel hose into the nose sidewalls
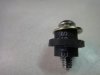
- Re-install the radiator over the protruding hoses using slightly longer bolts (e.g. I used AN4-11A)
- Install the locknuts loosely. There should be at least 1 1/2 threads showing to ensure they are secure, but they should be loose enough to rotate the bolt by hand once the nut is in position.
- Add a couple of AN7 (7/16") washers to each spreader bar so that the spreader bar does not pull the nose sidewalls in any tighter than they are with the radiator in position.
The hose cuts pretty easily with a fresh razor blade. The cuts are not perfectly square, but that's ok - if anything, an irregular cut provides more shock absorption.
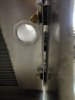
With this done, the radiator is not going anywhere, but can be wiggled a bit in its shock absorbing mount. It is not loose and there is resistance to any movement, but movement (and hopefully vibration isolation) is possible.
I had all the bits and pieces on hand, so total cost was nothing. If you had to buy everything, it might cost around $5.00, with hose left over for next time.
I'm learning as I go along, but this seemed to defeat the purpose of isolation mounting, especially compared with some other cars, where the radiator could be "wiggled" by hand.
To get a little more wiggle, I did this:
- Remove the radiator and crossbars
- Drill out the holes in the nose sidewalls to 17/32" (the diameter will depend on the size of inner hose chosen)
- Drill out the holes in the radiator brackets to 9/16" (a loose fit)
- Cut a 5/16" fuel hose into 8 lengths of 0.6" each
- Cut a 1/2" heater hose into 8 lengths of 0.2" each (making rings)
- Slip the heater hose rings over the fuel hose lengths
- Press the fuel hose into the nose sidewalls
- Re-install the radiator over the protruding hoses using slightly longer bolts (e.g. I used AN4-11A)
- Install the locknuts loosely. There should be at least 1 1/2 threads showing to ensure they are secure, but they should be loose enough to rotate the bolt by hand once the nut is in position.
- Add a couple of AN7 (7/16") washers to each spreader bar so that the spreader bar does not pull the nose sidewalls in any tighter than they are with the radiator in position.
The hose cuts pretty easily with a fresh razor blade. The cuts are not perfectly square, but that's ok - if anything, an irregular cut provides more shock absorption.
With this done, the radiator is not going anywhere, but can be wiggled a bit in its shock absorbing mount. It is not loose and there is resistance to any movement, but movement (and hopefully vibration isolation) is possible.
I had all the bits and pieces on hand, so total cost was nothing. If you had to buy everything, it might cost around $5.00, with hose left over for next time.