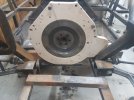
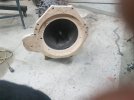
Making the adapter for the 351W to 996 trans. There was a good drawing for the 351W bolt pattern and Locating Bushings so not a problem. However the 996 Trans bolt pattern was none were to be found. Had to make a centering part to locate the tranny shaft XY ZERO and then a special bushing to hand drill .200 Dia holes in perfect alignment. And then on Mastercam create points by lowering the edge finder down in the hole and moving XY till perfect fit. I made the model out of wood as if i tried Aluminum I would have scrapped a lot of metal. I am using the 351W Ring gear. I have seen some the use the small 996 ring gear and a small gear then the starter. 3 gears ? Any way this will be stock starter and gear set up.

You are using an out of date browser. It may not display this or other websites correctly.
You should upgrade or use an alternative browser.
You should upgrade or use an alternative browser.
Alans Scratch build
- Thread starter hiiesalu
- Start date
Nice work Alan . Going to be a great ride when you are finished.
Regards Brian
Regards Brian
Darius Rudis
Supporter
I have a 302-based (363cid Aluminum block), mated to a Porshe 996.
If there is any way I can help, lemme know...

If there is any way I can help, lemme know...
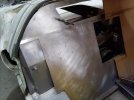
Working on sheet metal, making cardboard templates then![20241112_112901[1].jpg](https://www.gt40s.com/data/attachments/128/128737-48d761edb23455d77cbccf333a41f29e.jpg?hash=TLObfW3xI6 "20241112_112901[1].jpg")
![20241112_122037[1].jpg](https://www.gt40s.com/data/attachments/128/128738-58bb878258c82343fe166ed79566ae1f.jpg?hash=V5iCVjvYe7 "20241112_122037[1].jpg")
![20241112_112803[2].jpg](https://www.gt40s.com/data/attachments/128/128739-ee075b0d7ba043d4753589cdbf651831.jpg?hash=PVGsHP-KSp "20241112_112803[2].jpg")
![20241112_112901[1].jpg](https://www.gt40s.com/attachments/20241112_112901-1-jpg.143685/ "20241112_112901[1].jpg")
![20241112_122037[1].jpg](https://www.gt40s.com/attachments/20241112_122037-1-jpg.143686/ "20241112_122037[1].jpg")
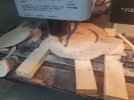
![20241112_112803[2].jpg](https://www.gt40s.com/attachments/20241112_112803-2-jpg.143687/ "20241112_112803[2].jpg") marking the Sheet metal for cutting. I bought a harbor freight sheet metal brake to make the bends to fit the frame. Part shown has 4 bends to fit. Also I recommend for cutting cardboard. Use a Jig saw with a razor blade cutter. It saws the card board very precise, clean.
marking the Sheet metal for cutting. I bought a harbor freight sheet metal brake to make the bends to fit the frame. Part shown has 4 bends to fit. Also I recommend for cutting cardboard. Use a Jig saw with a razor blade cutter. It saws the card board very precise, clean.
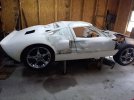
The door did not close, here is the modified version. There will be some Heli arc to get this finished.Working on sheet metal, making cardboard templates thenView attachment 143685View attachment 143686View attachment 143687View attachment 143685View attachment 143686View attachment 143687 marking the Sheet metal for cutting. I bought a harbor freight sheet metal brake to make the bends to fit the frame. Part shown has 4 bends to fit. Also I recommend for cutting cardboard. Use a Jig saw with a razor blade cutter. It saws the card board very precise, clean.
Attachments
![20241114_081014[1].jpg](/data/attachments/128/128759-7138b60f8c595d51f07bbe090597e5f9.jpg?hash=7H1pSsYrhX)
The door did not close, here is the modified version. There will be some Heli arc to get this finished. Next is the panel in cardboard that was cut to shape. And bent with the harbor freight brake. Using a dab of grease on the steel to mark difficult areas that sharpie could not get. After I used strong magnets to hold pattern in place. the rest of the pattern could be completed followed by marking the sheet metal. See razor blade jig saw blade, really made nice straight cuts in the cardboard pattern. Next is to cut sheet metal to fit then make NC points around the rear window for the CNC mill. The magnets really keep the pattern in place.
Attachments
![20241117_102110[1].jpg](/data/attachments/128/128794-498598e25906a22acd994da1c71a03ae.jpg?hash=P5HJG9jj7v)
The cardboard pattern worked out good, The Harbor freight brake barley made the bends .062 aluminum. Maybe a pre heat will help here. I am going to have a cover to work on motor if needed. Tomorrow on to the other side. And then a drive down to Industrial to get the 1.5 thick plate to finish the transmission adapter.
![20241117_134556[1].jpg](https://www.gt40s.com/attachments/20241117_134556-1-jpg.143743/ "20241117_134556[1].jpg")
Darius Rudis
Supporter
My ring gear and starter look different... post#143 above.
Hi there, I used the stock 351W ring gear and cut it down to fit the 996 clutch assembly my plate is 1.250 thick. No cutting of the 996 tranny or cutting of the 351 block. I think people use the 996 ring gear or a second gear. Do you have master cam i could e-mail it if you likeMy ring gear and starter look different... post#143 above.
Today i did the 996 axle to C5 axle. I cut off the 996 four inches from the end and found out it was hollow. That made it easy.
Then I drove out the C5 hub with a brass hammer (notice clip that holds it together) Then on my CNC lathe I turned a smaller shaft
on the C5 end .575 X 1.00 Later I will tig weld it together with a slip sleeve and pin weld it.
![IMG_20241129_141411[1].jpg](https://www.gt40s.com/attachments/img_20241129_141411-1-jpg.143989/ "IMG_20241129_141411[1].jpg")
![IMG_20241128_122723[1].jpg](https://www.gt40s.com/attachments/img_20241128_122723-1-jpg.143990/ "IMG_20241128_122723[1].jpg")
![IMG_20241129_141706[1].jpg](https://www.gt40s.com/attachments/img_20241129_141706-1-jpg.143991/ "IMG_20241129_141706[1].jpg")
![IMG_20241129_143703[2].jpg](https://www.gt40s.com/attachments/img_20241129_143703-2-jpg.143992/ "IMG_20241129_143703[2].jpg")
Then I drove out the C5 hub with a brass hammer (notice clip that holds it together) Then on my CNC lathe I turned a smaller shaft
on the C5 end .575 X 1.00 Later I will tig weld it together with a slip sleeve and pin weld it.
Neil
Supporter
A simple butt weld might work OK but if you cur the ends at , say a 45 degree angle and weld the two parts together you will have a stronger, more fatigue- resistant axle. Keeping the two parts aligned is critical, no matter how you do it. What is the dog's name?Today i did the 996 axle to C5 axle. I cut off the 996 four inches from the end and found out it was hollow. That made it easy.
Then I drove out the C5 hub with a brass hammer (notice clip that holds it together) Then on my CNC lathe I turned a smaller shaft
on the C5 end .575 X 1.00 Later I will tig weld it together with a slip sleeve and pin weld it.
View attachment 143989View attachment 143990View attachment 143991View attachment 143992
45 degree for sure. Holding off on welding for now. Thor is my dog my buddy. A German Shepard 120 pounds and a lap dog.A simple butt weld might work OK but if you cur the ends at , say a 45 degree angle and weld the two parts together you will have a stronger, more fatigue- resistant axle. Keeping the two parts aligned is critical, no matter how you do it. What is the dog's name?
Made some progress today did some sheet metal work cut out the rear window. Making template for driver side sheet metal. Also trying out some seat foams
Attachments


Similar threads
- Replies
- 14
- Views
- 2K
- Replies
- 4
- Views
- 1K