J. Salmon RCR-40 Build

Randy V

Moderator-Admin
Staff member
Admin
Lifetime Supporter
Very nice Jay! :thumbsup:

I like the bulkhead adapter for the heater hoses. Would you have the mfgr and part number handy?

How did you handle the connections on the inside to the heater core?

Your work is top-notch! Obviously your helpers contributed significantly! :)
 

Randy V

Moderator-Admin
Staff member
Admin
Lifetime Supporter
Thanks Jay -

So it takes a special O-Ring style AN adapter for the heater hoses it appears rather than a common AN Tapered seat. Correct? Any part numbers would be helpful as this is the way I plan on proceeding..
 
Randy, when I read the description, it seems misleading. You want 2-port heater hose fitting. But the description says -6 an heater hose and -10 an AC with o-ring. Mine are both -10 AN, taper, (no o-rings) on one side with slip-on hose fittings on the inside. The picture is what I have, the description doesn't seem to match. I think I would give Jegs a call and see, especially with the cost of the fitting.

Unfortunately, the integrity of the seal is untested on my car.
 

Randy V

Moderator-Admin
Staff member
Admin
Lifetime Supporter
HI Jay,

Thanks for the clarification.

from their picture it seems that there would be something other than a tapered seat - but it sounds like you rec'd something different.
I'll give them a call for clarification and to ensure that I purchase the correct Aeroquip fittings from them as well.

13566825.jpg

In polished finish only, these CNC-machined billet bulkheads feature a barbed end for a push-on style hose and clamp setup, and they are designed to work with 5/8'' heater hose. AC bulkheads work with one -6AN and one -10AN AC hose with O-ring fittings.

--edit -- apologies for the diversion here.. I appreciate the help a LOT...
 
Well, I am glad you had me looking closer at these. This is one of the first fittings I installed, and I guess I have learned a bit since then. I have the 10AN AC style o-ring fittings. I will obviously have to change this fitting. Luckily, I have (for some reason I cannot explain) a pair of -10AN flare bulkhead fittings and one AN to hose barb adapter. I will need another barb adapter and I'll be set. Anyone want a double barb to 10AN AC-o ring bulkhead fitting cheap?

In better news, I got the lift to cycle. It's pretty easy to set up. I do need lower spring perches. I thought at first it would work without them but once you start the lift up you see that is not the case.
 

Randy V

Moderator-Admin
Staff member
Admin
Lifetime Supporter
Well, I am glad you had me looking closer at these. This is one of the first fittings I installed, and I guess I have learned a bit since then. I have the 10AN AC style o-ring fittings. I will obviously have to change this fitting. Luckily, I have (for some reason I cannot explain) a pair of -10AN flare bulkhead fittings and one AN to hose barb adapter. I will need another barb adapter and I'll be set. Anyone want a double barb to 10AN AC-o ring bulkhead fitting cheap?

Jay - I was unable to get any assistance from the guy at Jegs. Seems that they're not sure what fittings to purchase either!.

So do I read that you have two double-bulkhead adapters? Or?? Is your adapter like the one pictured above that appears to require an O-Ring hose fitting and you currently have an AN Tapered fitting screwed to it? Maybe I need to have another cup of coffee! :)
 
Randy,
if you want to use this type of fitting, get the -6an flare heater hose fitting. You will end up using short runs of 6 an heater lines, but I don't think you will have any trouble getting the cabin to warm up.
I accidentally bought the -10 AN AC o-ring fittings. That is where the link takes you. You don't want that.
-J.
 
Randy:

Don't know if this helps, but here is info re the fittings from a previous post. The folks at Hot Rod air may be a bit more helpful than Jegs:

The pass through fittings for the heater hoses were obtained from Hot Rod Air, Heater Bulkhead, #10 O-Ring x 5/8 Barb 14-1432. We used two 45 degree angled fittings to secure the heater hoses to the bulkhead fittings, Heater 45 Degree Female O-Ring, 05-1400.

http://www.hotrodair.com/index.cfm/page/ptype=product/product_id=124/category_id=17/home_id=2/mode=prod/prd124.htm

http://www.hotrodair.com/index.cfm/page/ptype=product/product_id=2/category_id=35/home_id=2/mode=prod/prd2.htm
 

Attachments

  • HeaterValve.JPG
    HeaterValve.JPG
    180.9 KB · Views: 671
  • FrontFireWall3.JPG
    FrontFireWall3.JPG
    140.9 KB · Views: 563
Last edited:

Randy V

Moderator-Admin
Staff member
Admin
Lifetime Supporter
Guys - thank you VERY much... Most helpful!!!! :)

---Now why didn't I think of calling HotRod Air? ((sigh)) --
 
Delivered!

Loaded and delivered to Val Burd. Very excited about them keeping me out of any trouble.
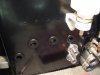
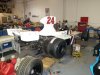
They were very impressed with the tub, and they don't give out praise easily. We talked for about 3 hours going over every aspect of the car, what I had done, what I had planned, and what needed to be done. First step is going to be finishing the chassis setup, establishing alignment and ride height. This will require my transaxle subframe to be made, which is going to mount the sway bar pillow blocks and give clearance for the axles. I'll report as it goes along. I didn't take any pictures there, but I snapped a few as we loaded it.

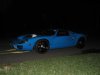
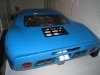
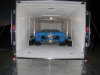
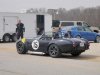
It was dark by the time we got it into the trailer Thursday night. But for a few minutes it was sitting outiside in the fading light with all the body panels on it, sitting pretty close to final ride height. Seeing the car in the wild about blew my mind. In the garage or a closed space under fake light, you just do not get the full impoact; not even close (nor in pictures for that matter, but I snapped some anyway). Outside, in one glance you see how special the shape of this car is. How low is is. How flowing and proportioned. It's a design that is now 45 years old, and I think it has not been equalled since.

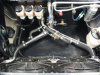
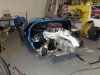
I wasn't prepared for how well the white headers look through the bodywork. Fantastic.
 

Attachments

  • trasnport1.jpg
    trasnport1.jpg
    30.1 KB · Views: 739
  • transport4.jpg
    transport4.jpg
    29.6 KB · Views: 734
  • transport3.jpg
    transport3.jpg
    38.6 KB · Views: 770
Yeee Haw! Titled in VA! Going to get registration tomorrow. I was down at the shop at VIR to check in on the progress and to meet the state policeman who applied the VIN to the chassis and gave me the title. I love the VIN: RCR0046. That made the insurance company scratch their head, but not for long. I love USAA (which incidentally was significantly cheaper than Hagerty with more coverage and a lower deductible, and the same agreed value for both).

So far, the alignment was pretty easy. Car with all body panels and most of the hardware was 2215 pounds empty. He guessed under 2600 pounds complete, with me included (we'll see). Corner weights are within 8 pounds front and rear. Val remarked that the chassis is obviously very stiff, and any input to balance the weight met with immediate response. He said he had not problem getting it where he wanted.

The goal is still April to have it running. They have certainly put together some hellacious projects in short order, but it does still seem there is a lot to do. I plan to bug them like crazy, squeaky wheel kinda thing!
 
Progress: slowly... slowly...
Went down and hung out at VIR with Val. Dad drove the Cobra, but I left my gear behind and spent the day in the garage. We got the rear clip pretty close to final and removed it. We then set about getting the rear of the car together. the locating rods for the rear panel have to be relocated. We are going to support the top of the transaxle, we made double sure the axles fit, And we made plans to mount the coolers. The sway bar is another story. We are looking at how to do that. It is very tight above the tranny.

The car is in good company, sleeping next to ex-James Hunt Heskith F1 car.

And - despite not being ready to run, it is fully legal, with registration, plates, and insurance.
 

Attachments

  • 3-10a.jpg
    3-10a.jpg
    36.7 KB · Views: 685
  • 3-10b.jpg
    3-10b.jpg
    49.1 KB · Views: 964
  • 3-10c.jpg
    3-10c.jpg
    49.2 KB · Views: 787
  • 3-10d.jpg
    3-10d.jpg
    35.8 KB · Views: 657
11 months.

11 months and virtually nothing has happened. The windage tray was installed in the motor and the axles were corrected and installed.

So Thursday the chassis is coming home, and I will start again wiring, AC system, and center console. Then it will be body work time. I hope that it will go back to Val (I really am not that upset, but it's a long story....) but it just might go elsewhere. I simply refuse NOT to be driving this car in the early spring.

So here I come again.

The hiatus has been good for me. I was a bit burned out then, now I am chomping at the bit.
 
Burn out is a bad thing ...stepping away for a bit always is usually a good thing.
Bummer it sat so long with no progress. I worry about that when it's my turn to sent it out for sublet work.
 
Take it back to RCR, it will be done in a hurry and thereafter allow RCR to offer solutions to others that are using the same transaxle.
 
Every waking minute now. I have parts coming from all over. The weatherpack connectors are in, waiting on wire and ring terminals. Also ordered extra Molex terminals for the 14 pin dash connectors that ISIS uses. I have all the necessary small plumbing parts to be here by the weekend. I also have some fittings to pressure test the fluid systems (oil, fuel, water). My AC guru is coming tomorrow to look at crimping the last two lines and charging the system. My goal is to complete the plumbing (minus the fillers) and wiring (minus the actual lights, which are not at the house) by the end of the month.

Pics at the end of the weekend, to see how it is going. Now I remember why it was best to let it go for a while.
 
Text update, no time for pictures yet.

Gauge wiring harness done (first one I have done, quite pleased). Using Packard weatherpack connectors, three connectors harness the entire gauge set. Starting the switches tonight. Because I have the Isis system for all but a few items (AC, front lift, wiper, rear cooling fans) I will primarily use the connectors that came with their dash wiring kit. Still waiting on switches...

...and still groping for a few fittings, but I have answers to some questions: I drilled three small holes in the thermostat at the suggesting of the guys at Meziere. This means I have a little bit of flow past the valve when closed to help remove air. This will also reduce my concerns about the 6 foot -6 bypass hose. I am plumbing a bleed line like everybody else from driver's top corner of the radiator back to the tank.

By the way, Hot Rod Air is gone, so I have made my own adapters for the bulkhead fitting with two steel AC style o-ring fittings and two weld-on AN fittings. I'll get pics when I get a chance. Back to work.
 
Back
Top