Dave Forster
Supporter
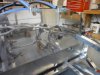
Shortly after our car arrived in the shop, I looked at the empty engine bay and thought it would be cool to spend a couple of hours polishing the aluminum.
Ignorance is bliss. 50 hours later, I'm not sure it was the brightest idea I've ever had.
Of course, much of that time was spent in do-overs. I've never polished aluminum before and there was lots of trial and error.
Here's what I learned and did. Hopefully it might save other inexperienced masochists some time:
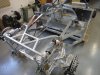
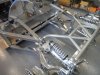
There are three types of structure which asked to be polished:
i) The tubes
ii) The suspension bits
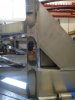
iii) The firewall (sheet aluminum).
Each one required a slightly different technique.
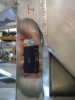
i) The tubes have lines in them which are left over from the manufacturing process. While they can be polished to a shine without removing the lines, in order to get a mirror finish, the lines need to be removed first. This was done with a right angle die grinder using two different 3" scotchbrite wheels - a purple one (more coarse) to remove the lines, followed by a green one (less coarse) to remove some of the marks left by the purple one. After this, an air driven polisher with a 3" foam backing pad and 1200 grit 3M hookit discs was used to remove the scratches left by the green scotchbrite pad. As it turned out, this was probably a bit too fine, as the pads loaded up pretty quickly. Probably something around 600 grit would have been fine, but I had purchased a box of 50, so was determined to use them up. At this point, the tubes were ready for polish. I tried a few different brands and polishing methods, but settled on Nuvite "C" grade with a 4" cotton disc or cotton cone in a drill turning around 2,000 rpm. Note that the cotton disc loads up with polish after several minutes of use and then starts being less effective. When this happens, it needs to be cleaned with a "rake", by dragging the rake across it in the opposite direction from the direction it spins in. Once under way, this needs to be done every few minutes. You can get some good tips on the actual polishing technique from www.PerfectPolish.com. I found it took 3-5 passes before the tubes had a nice mirror finish, but there were still some small swirl marks and cloudiness in spots. These were removed using Alumapolish and either hand polishing with microfiber cloths or using a 3M 3" Perfect-It sponge pad in a drill. I found that even with the microfiber cloths, it is easy to put scratches in a mirror finish, so a light touch is required at the final stages.
ii) The suspension bits were done using Alumapolish and microfiber cloths. No pre-sanding was necessary as the parts have already been machined smooth. These bits are probably the biggest bang for the buck in terms of not taking much time and coming out with a nice gloss.
iii) The firewall is sheet aluminum and doesn't have the manufacturing marks that the tubes have. That being said, they did have some scratches (gouges) in them, which were removed with the scotchbrite wheels. They also have a grain which will show through unless mechanically sanded smooth, first. To do this, a random orbital sander and 6", 400 grit hookit discs on a foam pad was used. After sanding, a rotary polisher with a 7" 3M Perfect it pad was used along with Nuvite C. 3 passes were needed to get a mirror finish. This was followed by Alumapolish and another 7" Perfect it pad. Any leftover polish was removed using lacquer thinner and a blue paper shop towel. The blue towels are much better than normal white paper towels, which easily leave scratches. The blue ones will scratch, too, so a light touch is required. The lacquer thinner itself leaves a slight cloudy depost behind, which was removed with a dry microfiber cloth (again, a light touch is required).
I had planned to protect the polished aluminum with Alumaclear, but found that for mirror surfaces, it turns a mirror finish into a satin finish. It works OK for the suspension parts that are only polished to shiny, but is not good for the firewall or tubes. I am going to contact them to find out if I was doing something wrong, or if this is a limitation of their clear coat product.
Here's a list of some of the tools and supplies I used:
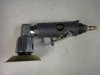
1) 90 degree die grinder: Harbor Freight, $16: Angle Die Grinder - Air Powered
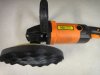
2) Air Polisher: Harbor Freight, Harbor Freight $30: Mini Orbital Air Sander
3) Variable Speed Polisher: Harbor Freight, $40: Sander/Polisher - 7 Speed Electric Sander & Polisher
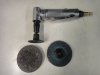
4) Scotchbrite pads: Harbor Freight, $16: 2 in, 3 in. Fiber Disc Sanding Kit
5) Nuvite: Metal Polishing Equipment : Auto Detailing Supplies : Electric Car Polishers : Airplane Polish : Auto Polisher : Aluminum : Polishers and Buffers : PerfectPolish.com, $22: PerfectPolish
6) Alumapolish: Alumaclear, $20: AlumaClear | AlumaPolish | Aluminum Cleaning, Polish, Restoration, and Protection
7) Cotton cleaning Rake: PJ Tool and Supply $15: Buffing Wheel Rake For Cleaning Polishing Wheels
8) 3" Foam Sanding pad for harbor freight polisher: $22 Amazon: [ame=http://www.amazon.com/dp/B0046VUJ5A/ref=pe_385040_30332190_pe_175190_21431760_M3T1_ST1_dp_1]3M 20427 3" x 1/2" x 5/16" Thread Size Clean Sanding Disc Pad Kit : Amazon.com : Automotive[/ame] Note that the harbor freight air polisher has an odd metric thread on it. It is hard to find sanding pads that will fit it. This one comes with adapters that will work.
9) Microfiber towels: $2.50 Harbor Freight 4 Piece Microfiber Cleaning Cloths. I went through 3-4 packs.
10) 3M Hookit 3" sanding pads. $35 Autobodynow.com: 3M 00908 Hookit 3" P1200 Grade Finishing Film Disc, (Box of 50) | Auto Body Now
11) 4" Cotton Buffing Wheel $4 Harbor Freight: 4" Buffing Wheel
Ignorance is bliss. 50 hours later, I'm not sure it was the brightest idea I've ever had.
Of course, much of that time was spent in do-overs. I've never polished aluminum before and there was lots of trial and error.
Here's what I learned and did. Hopefully it might save other inexperienced masochists some time:
There are three types of structure which asked to be polished:
i) The tubes
ii) The suspension bits
iii) The firewall (sheet aluminum).
Each one required a slightly different technique.
i) The tubes have lines in them which are left over from the manufacturing process. While they can be polished to a shine without removing the lines, in order to get a mirror finish, the lines need to be removed first. This was done with a right angle die grinder using two different 3" scotchbrite wheels - a purple one (more coarse) to remove the lines, followed by a green one (less coarse) to remove some of the marks left by the purple one. After this, an air driven polisher with a 3" foam backing pad and 1200 grit 3M hookit discs was used to remove the scratches left by the green scotchbrite pad. As it turned out, this was probably a bit too fine, as the pads loaded up pretty quickly. Probably something around 600 grit would have been fine, but I had purchased a box of 50, so was determined to use them up. At this point, the tubes were ready for polish. I tried a few different brands and polishing methods, but settled on Nuvite "C" grade with a 4" cotton disc or cotton cone in a drill turning around 2,000 rpm. Note that the cotton disc loads up with polish after several minutes of use and then starts being less effective. When this happens, it needs to be cleaned with a "rake", by dragging the rake across it in the opposite direction from the direction it spins in. Once under way, this needs to be done every few minutes. You can get some good tips on the actual polishing technique from www.PerfectPolish.com. I found it took 3-5 passes before the tubes had a nice mirror finish, but there were still some small swirl marks and cloudiness in spots. These were removed using Alumapolish and either hand polishing with microfiber cloths or using a 3M 3" Perfect-It sponge pad in a drill. I found that even with the microfiber cloths, it is easy to put scratches in a mirror finish, so a light touch is required at the final stages.
ii) The suspension bits were done using Alumapolish and microfiber cloths. No pre-sanding was necessary as the parts have already been machined smooth. These bits are probably the biggest bang for the buck in terms of not taking much time and coming out with a nice gloss.
iii) The firewall is sheet aluminum and doesn't have the manufacturing marks that the tubes have. That being said, they did have some scratches (gouges) in them, which were removed with the scotchbrite wheels. They also have a grain which will show through unless mechanically sanded smooth, first. To do this, a random orbital sander and 6", 400 grit hookit discs on a foam pad was used. After sanding, a rotary polisher with a 7" 3M Perfect it pad was used along with Nuvite C. 3 passes were needed to get a mirror finish. This was followed by Alumapolish and another 7" Perfect it pad. Any leftover polish was removed using lacquer thinner and a blue paper shop towel. The blue towels are much better than normal white paper towels, which easily leave scratches. The blue ones will scratch, too, so a light touch is required. The lacquer thinner itself leaves a slight cloudy depost behind, which was removed with a dry microfiber cloth (again, a light touch is required).
I had planned to protect the polished aluminum with Alumaclear, but found that for mirror surfaces, it turns a mirror finish into a satin finish. It works OK for the suspension parts that are only polished to shiny, but is not good for the firewall or tubes. I am going to contact them to find out if I was doing something wrong, or if this is a limitation of their clear coat product.
Here's a list of some of the tools and supplies I used:
1) 90 degree die grinder: Harbor Freight, $16: Angle Die Grinder - Air Powered
2) Air Polisher: Harbor Freight, Harbor Freight $30: Mini Orbital Air Sander
3) Variable Speed Polisher: Harbor Freight, $40: Sander/Polisher - 7 Speed Electric Sander & Polisher
4) Scotchbrite pads: Harbor Freight, $16: 2 in, 3 in. Fiber Disc Sanding Kit
5) Nuvite: Metal Polishing Equipment : Auto Detailing Supplies : Electric Car Polishers : Airplane Polish : Auto Polisher : Aluminum : Polishers and Buffers : PerfectPolish.com, $22: PerfectPolish
6) Alumapolish: Alumaclear, $20: AlumaClear | AlumaPolish | Aluminum Cleaning, Polish, Restoration, and Protection
7) Cotton cleaning Rake: PJ Tool and Supply $15: Buffing Wheel Rake For Cleaning Polishing Wheels
8) 3" Foam Sanding pad for harbor freight polisher: $22 Amazon: [ame=http://www.amazon.com/dp/B0046VUJ5A/ref=pe_385040_30332190_pe_175190_21431760_M3T1_ST1_dp_1]3M 20427 3" x 1/2" x 5/16" Thread Size Clean Sanding Disc Pad Kit : Amazon.com : Automotive[/ame] Note that the harbor freight air polisher has an odd metric thread on it. It is hard to find sanding pads that will fit it. This one comes with adapters that will work.
9) Microfiber towels: $2.50 Harbor Freight 4 Piece Microfiber Cleaning Cloths. I went through 3-4 packs.
10) 3M Hookit 3" sanding pads. $35 Autobodynow.com: 3M 00908 Hookit 3" P1200 Grade Finishing Film Disc, (Box of 50) | Auto Body Now
11) 4" Cotton Buffing Wheel $4 Harbor Freight: 4" Buffing Wheel
Attachments
-
 DSC04783.JPG108.2 KB · Views: 564
 -
 DSC04778.JPG140 KB · Views: 586
 -
 DSC04781.JPG138.4 KB · Views: 605
 -
 DSC04779.JPG88.1 KB · Views: 482
 -
 DSC04772.JPG74 KB · Views: 487
 -
 DSC04773.JPG72.9 KB · Views: 431
 -
 DSC04768.JPG73.9 KB · Views: 436
 -
 DSC04769.JPG86 KB · Views: 465
 -
 DSC04771.JPG81.8 KB · Views: 417
Last edited: